The Results

By:  Cole Francis, Senior Solution Architect, The PSC Group, LLC

Let’s just say that I had a situation where I was calling a third-party API to return valuable information, but that third-party service occasionally failed.  What I discovered through recursion is that 1 out of every 3-5 calls succeeded, but it wasn’t guaranteed.  Therefore, I couldn’t simply wrap my core logic in a hard-coded iterative loop and expect it to succeed.  So, I was relegated to either coming up with a way to write some custom Retry logic to handle errors and reattempt the call or locating and existing third-party package that offers this sort of functionality as not to reinvent the proverbial wheel.

Fortunately, I stumbled across a .NET NuGet Package called Polly.   After reading the abstract about the offering (Click Here to Read More About the Polly Project), I discovered that Polly is a .NET compatible library that complies with transient-fault-handling logic by implementing policies that offer thread-safe resiliency to Retry, Circuit Breaker, Timeout, Bulkhead Isolation, and Fallback logic, and in a way that is very easy to implement inside a .NET project codebase.  I also need to point out that Polly targets .NET 4.0, .NET 4.5 and .NET Standard 1.1.

While Polly offers a plethora of capabilities, many of which I’ll keep in my back pocket for a rainy day, I was interested in just one, the Retry logic.  Here’s how I implemented it.  First, I included the Polly NuGet Package in my solution, like so:

The Results

Next, I included the following lines of code when calling the suspect third-party Web API:

// Here is my wait and retry policy, with 250 millisecond wait intervals.
// It will attempt to call the API 10 times.
Policy
  .Handle(e => (e is Exception))
  .WaitAndRetry(10, attempt => TimeSpan.FromMilliseconds(250))
  .Execute(() =>
  {
    // Your core logic should go here!  
    // If an exception is thrown by the called object, 
    // then Polly will wait 250ms and try again for a total of 10 times.
    var response = CallToSuspectThirdPartyAPI(input);
  });

That’s all there really is to it, and I’m only scratching the surface when it comes to Polly’s full gamut of functionality.  Here’s a full list of Polly’s capabilities if you’re interested:

  1. Retry – I just described this one to you.
  2. Circuit Breaker – Fail fast under struggling conditions (you define the conditions and thresholds).
  3. Timeout – Wait until you hit a certain point, and then move on.
  4. Bulkhead Isolation – Provides fault isolation, so that certain failing threads don’t fault the entire process.
  5. Cache – Provides caching (temporary storage and retrieval) capabilities.
  6. Fallback – Anticipates a potential failure and allows a developer to provide an alternative course of action if a potential failure is ever realized.
  7. PolicyWrap – Allows for any (and all) of the previously mentioned policies to be combined, so that different programmatic strategies can be exercised when different faults occur.

Thanks for reading, and keep on coding!  🙂

The Results

Author:  Cole Francis, Senior Solution Architect @ The PSC Group, LLC

Download the Source Code for This Example Here!

BACKGROUND

Traditionally speaking, creating custom Microsoft Windows Services can be a real pain.  The endless and mind-numbing repetitions of using the InstallUtil command-line utility and Ctrl+Alt+P attachments to the debug the code from the Microsoft Visual Studio IDE are more than enough to discourage the average Software Developer.

While many companies are now shying away from writing Windows Services in an attempt to get better optics around job failures, custom Windows Services continue to exist in limited enterprise development situations where certain thresholds of caution are exercised.

But, if you’re ever blessed with the dubious honor of having to write a custom Windows Service, take note of the fact that there are much easier ways of approaching this task than there used to be, and in my opinion one of the easiest ways is to use a NuGet package called TopShelf.

Here are the top three benefits of using TopShelf to create a Windows Service:

  1. The first benefit of using TopShelf is that you get out from underneath the nuances of using the InstallUtil command to install and uninstall your Windows Service.
  2. Secondly, you create your Windows Service using a simple and familiar Console Application template type inside Microsoft Visual Studio.  So, not only is it extraordinarily easy to create, it’s also just as easy to debug and eventually transition into a fully-fledged Windows Service leveraging TopShelf. This involves a small series of steps that I’ll demonstrate for you shortly.
  3. Because you’ve taken the complexity and mystery out of creating, installing, and debugging your Windows Service, you can focus on writing better code.

So, now that I’ve explained some of the benefits of using TopShelf to create a Windows Service, let’s run through a quick step-by-step example of how to get one up and running.  Don’t be alarmed by the number of steps in my example below.  You’ll find that you’ll be able to work through them very quickly.


Step 1

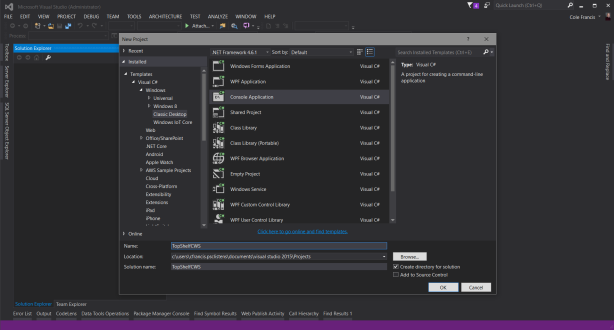
The first step is to create a simple Console Application in Microsoft Visual Studio.  As you can see in the example below, I named mine TopShelfCWS, but you can name yours whatever you want.

The Results


Step 2

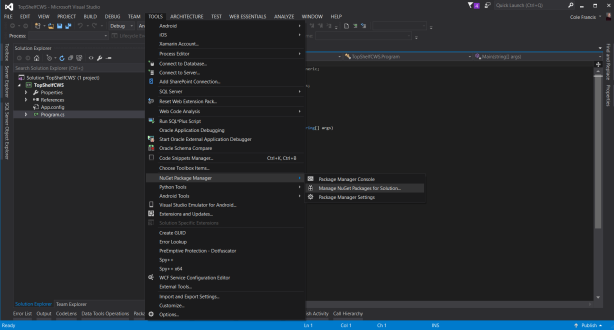
The second step is to open the NuGet Package Manager from the Microsoft Visual Studio IDE menu and then click on the Manage NuGet Packages for Solution option in the submenu as shown in the example below.

The Results


Step 3

After the NuGet Package Manager screen appears, click on the Browser option at the top of the dialog box, and then search on the words “TopShelf”.  A number of packages should appear in the list, and you’ll want to select the one shown in the example below.

The Results


Step 4

Next, select the version of the TopShelf product that aligns with your project or you can simply opt to use the default version that was automatically selected for you, which is what I have done in my working example.

Afterwards, click the Install button.  After the package successfully installs itself, you’ll see a green checkbox by the TopShelf icon, just like you see in the example below.

The Results


Step 5

Next, add a new Class to the TopShelfCWS project, and name it something that’s relevant to your solution.  As you can see in the example below, I named my class NameMeAnything.

The Results


Step 6

In your new class (e.g. NameMeAnything), add a reference to the TopShelf product, and then inherit from ServiceControl.

The Results


Step 7

Afterwards, right click on the words ServiceControl and implement its interface as shown in the example below.

The Results


Step 8

After implementing the interface, you’ll see two new events show up in your class.  They’re called Start() and Stop(), and they’re the only two events that the TopShelf product relies upon to communicate with the Windows Service Start and Stop events.

The Results


Step 9

Next, we’ll head back to the Main event inside the Program class of the Console Application.  Inside the Main event, you’ll set the service properties of your impending Windows Service.  It will include properties like:

  • The ServiceName: Indicates the name used by the system to identify this service.
  • The DisplayName: Indicates the friendly name that identifies the service to the user.
  • The Description: Gets or sets the description for the service.

For more information, see the example below.

The Results


Step 10

Let’s go back to your custom class one more time (e.g. NameMeAnything.cs), and add the code in the following example to your class.  You’ll replace this with your own custom code at some point, but following my example will give you a good idea of how things behave.

The Results


Step 11

Make sure you include some Console writes to account for all the event behaviors that will occur when you run it.

The Results


Step 12

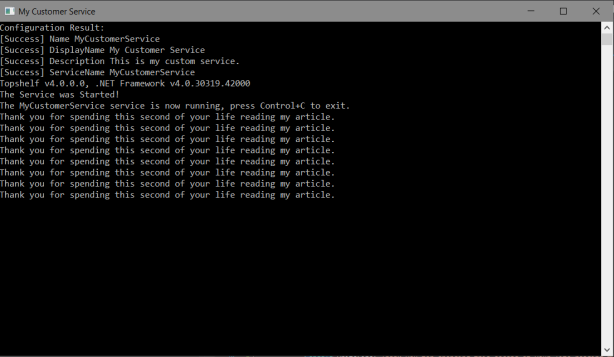
As I mentioned earlier, you can run the Console Application simply as that, a Console Application.  You can do this by simply pressing the F5 key.  If you’ve followed my example up to this point, then you should see the output shown in the following example.

The Results


Step 13

Now that you’ve run your solution as a simple Console Application, let’s take the next step and install it as a Window Service.

To do this, open a command prompt and navigate to the bin\Debug folder of your project.   *IMPORTANT:  Make sure you’re running the command prompt in Administrator mode* as shown in the example below.

The Results


Step 14

One of the more beautiful aspects of the TopShelf product is how it abstracts you away from all the .NET InstallUtil nonsense.  Installing your Console Application as a Windows Service is as easy as typing the name of your executable, followed by the word “Install”.  See the example below.

The Results


Step 15

Once it installs, you’ll see the output shown in the example below.

The Results


Step 16

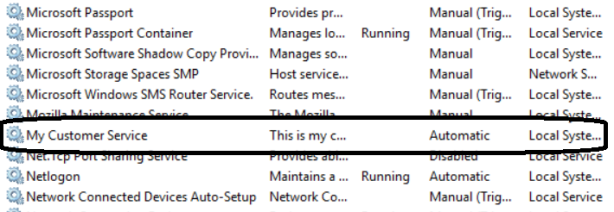
What’s more, if you navigate to the Windows Services dialog box, you should now see your Console Application show up as a fully-operable Windows Service, as depicted below.

The Results


Step 17

You can now modify the properties of your Windows Service and start it.  Since all I’m doing in my example is executing a simple timer operation and logging out console messages, I just kept all the Windows Service properties defaults and started my service.  See the example below.

The Results


Step 18

If all goes well, you’ll see your Windows Service running in the Windows Services dialog box.

The Results


Step 19

So, now that your console application is running as a Windows Service, you’re absent the the advantage of seeing your console messages being written to the console. So, how do you debug it?

The answer is that you can use the more traditional means of attaching a Visual Studio process to your running Windows Service by clicking Ctrl + Alt + P in the Visual Studio IDE, and then selecting the name of your running Windows Service, as shown in the example below.

The Results


Step 20

Next, set a breakpoint on the _timer_Elapsed event.  If everything is running and hooked up properly, then your breakpoint should be hit every second, and you can press F10 to step it though the event handler that’s responsible for writing the output to the console, as shown in the example below.

The Results


Step 21

Once you’re convinced that your Windows Service is behaving properly, you can stop it and test the TopShelf uninstallation process.

Again, TopShelf completely abstracts you away from the nuances of the InstallUtil utility, by allowing you to uninstall your Windows Service just as easily as you initially installed it.

The Results


Step 22

Finally, if you go back into the Windows Services dialog box and refresh your running Windows Services, then you should quickly see that your Windows Service has been successfully removed.

The Results


SUMMARY

In summary, I walked you through the easy steps of creating a custom Windows Service using the TopShelf NuGet package and a simple C# .NET Console application.

In the end, starting out with a TopShelf NuGet package and a simple Console application allows for a much easier and intuitive Windows Service development process, because it abstracts away all the complexities normally associated with traditional Windows Service development and debugging, resulting in more time to focus on writing better code. These are all good things!

Hi, I’m Cole Francis, a Senior Solution Architect for The PSC Group, LLC located in Schaumburg, IL.  We’re a Microsoft Partner that specializes in technology solutions that help our clients achieve their strategic business objectives.  PSC serves clients nationwide from Chicago and Kansas City.

Thanks for reading, and keep on coding!  🙂

CreateImagefromPDF

By: Cole Francis, Senior Architect at The PSC Group, LLC.

Let’s say you’re working on a hypothetical project, and you run across a requirement for creating an image from the first page of a client-provided PDF document.  Let’s say the PDF document is named MyPDF.pdf, and your client wants you to produce a .PNG image output file named MyPDF.png.

Furthermore, the client states that you absolutely cannot read the contents of the PDF file, and you’ll only know if you’re successful if you can read the output that your code generates inside the image file.  So, that’s it, those are the only requirements.   What do you do?

SOLUTION

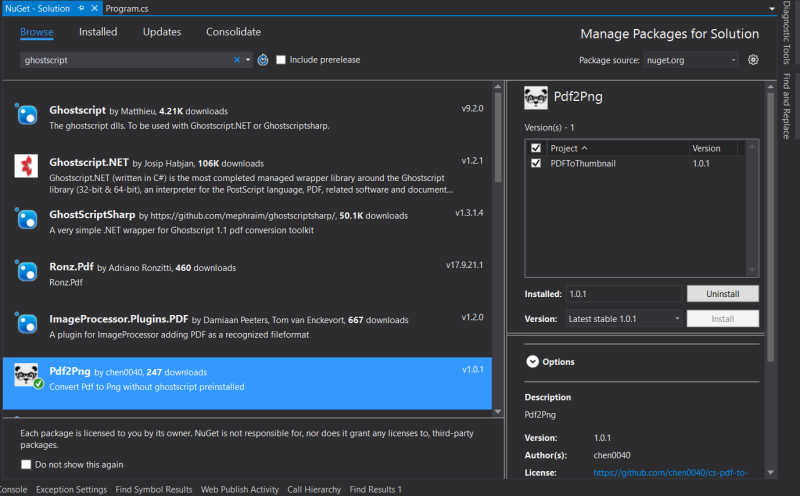
Thankfully, there are a number of solutions to address this problem, and I’m going to use a lesser known .NET NuGet package to handle this problem.  Why?  Well, for one I want to demonstrate what an easy problem this is to solve.  So, I’ll start off by searching in the .NET NuGet Package Manager Library for something describing what I want to do.  Voila, I run across a lesser known package named “Pdf2Png”.  I install it in less than 5 seconds.

Pdf2Png.png

So, is the Pdf2Png package thread-safe and server-side compliant?  I don’t know, but I’m not concerned about it because it wasn’t listed as a functional requirement.  So, this is something that will show up as an assumption in the Statement-of-Work document and will be quickly addressed if my assumption is incorrect.

Next, I create a very simple console application, although this could be just about any .NET file type, as long as it has rights to the file system.  The process to create the console application takes me another 10 seconds.

Next, I drop in the following three lines of code and execute the application, taking another 5 secondsThis would actually be one line of code if I was passing in the source and target file locations and names.

 string pdf_filename = @"c:\cole\PdfToPng\MyPDF.pdf";
 string png_filename = @"c:\cole\PdfToPng\MyPDF.png";
 List errors = cs_pdf_to_image.Pdf2Image.Convert(pdf_filename, png_filename);

Although my work isn’t overwhelmingly complex, the output is extraordinary for a mere 20 seconds worth of work!  Alas, I have not one, but two files in my source folder.  One’s my source PDF document, and the other one’s the image that was produced from my console application using the Pdf2Png package.

TwoFiles.png

Finally, when I open the .PNG image file, it reveals the mysterious content that was originally inside the source PDF document:

SomeThingsArentHard.png

Before I end, I have to mention that the Pdf2Png component is not only simple, but it’s also somewhat sophisticated.  The library is a subset of Mark Redman’s work on PDFConvert using Ghostscript gsdll32.dll, and it automatically makes the Ghostscript gsdll32 accessible on a client machine that may not have it physically installed.

Thanks for reading, and keep on coding!  🙂

AngularJS SPA

By:  Cole Francis, Senior Solution Architect at The PSC Group, LLC.

PROBLEM

There’s a familiar theme running around on the Internet right now about certain problems associated with generating SEO-friendly Sitemaps for SPA-based AngularJS web applications.  They often have two funamental issues associated with their poor architectural design:

  1. There’s usually a nasty hashtag (#) or hashbang (#!) buried in the middle of the URL route, which the website ultimately relies upon for parsing purposes in order to construct the real URL route (e.g. https://www.myInheritedWebApp.com/stuff/#/items/2
  2. Because of the embedded hashtag or hashbang, the URL’s are dynamically constructed and don’t actually point to content without parsing the hashtag (or hashbang) operator first.  The underlying problem is that a Sitemap.xml document can’t be auto-generated for SEO indexing.

I realize that some people might be offended by my comment about “poor achitectural design”.  I state this loosely, because it’s really just the nature of the beast.  Why?  Because it’s really easy to get started with AngularJS, and many Software Developers simply start laying down code that’s initially decent, but at some point they start implementing hacks because of added complexity to the original functional requirements.  That’s where they begin to get themselves in trouble very creative. 🙂

If you think I’m kidding, then just try Googling the following keywords and you’ll see exactly what I mean:  AngularJS, hash, hashbang, SEO, Sitemap, problem.

SOLUTION

So, the first step is to remove the hashtag (#) or the hashbang (#!).  I know it sucks, and it’s going to require some work, but let me be clear.  Do it!  For one, generating the Sitemap will be much easier, because you won’t need to parse on a hashtag (or hashbang) to get the real URL.  Secondly, all the remediation work you do will be a reminder the next time you think about taking shortcuts.

Regardless, after correcting the hashtag problem, you still have another issue.  Your website is still an AngularJS SPA-based website, which means that all its content is dynamically generated and injected through JavaScript AJAX calls.

Given this, how will you ever be able to generate a Sitemap containing all your content (e.g. products, catalogs, people, etc…)? Even more concerning, how will people find your people or products when searching on Google?

Luckily, the answer is very simple.  Here’s a little gem that I recently ran across while trying to generate a Sitemap.xml document on an AngularJS SPA architected website, and it works like a charm:  http://botmap.io/

I literally copied the script on the BotMap website to the bottom of my shared\_Layout.cshtml file, just above the closing tag.  This gives BotMap permission to crawl your website.  After doing this, push your website to Production, then point the BotMap website to your publicly-facing URL, and finally click the button on their website to initiate the crawl.  One and done!

BotMap begins to crawl and catalog your website as if it was a real person browsing it. It doesn’t use CURL or xHttp requests to determine what to catalog. The BotMap crawler actually executes the JavaScript, which is how it ultimately learns about all of the content on your website that it will use to construct the Sitemap.  

This is why it’s so great for websites created using AngularJS or other JavaScript frameworks where content is injected inside the JavaScript code itself.  Congratulations, {{vm.youreDone}}!

Thanks for reading, and keep on coding!  🙂

My First Azure Function

Posted: July 6, 2017 in Azure, Azure Functions, Cloud
Tags:

Main

BACKGROUND

Azure functions are an ideal way to write discrete pieces of code in the cloud without concerning yourself with the machine and infrastructure that will support them.  Azure functions also offer a variety of different development language choices, including C#, Python, PHP, Node.js, and F#.

Furthermore, Azure functions are able to run inside the Azure Compute Stack’s “Consumption Hosting Plan”, which means that you only get charged for the amount of time the code executes.  They also support NuGet and NPM Package Management, so you still have access to all of your favorite templates and libraries.  

Additionally, they come with integrated security, so OAuth providers, such as Azure AD, Microsoft Account, Facebook, Google, and Twitter are readily available.

Moreover, you can easily integrate with Azure services and SaaS offerings, including Azure Cosmos DB, Azure Event Hubs, Azure Mobile Apps (tables), Azure Notification Hubs, Azure Service Bus, Azure Storage, GitHub (through webhooks),  on-prem (using Service Bus), Twilio (SMS messages).

In addition to this, you can code your functions right inside the Azure portal, which I’ll do in my example, and you can even setup continuous integration and deploy your code through VSTS and GitHub (and others).

In the following step-by-step example, I’ll create my very first Azure function.  If you’re new to this like I am, then perhaps you can create your very first Azure function together with me?  In any case, here we go…

STEP 1

The first step is to login to your Microsoft Azure Portal account.  Once you’ve successfully done this, then click “New” on the left navigation bar.

Step1

STEP 2

When the “New” menu pops up, click on the “Compute” option in the list.

Step 2

STEP 3

Once you click on the “Compute” item in the Marketplace selections, look for the “Function App” option in the Compute item list.

Step3

STEP 4

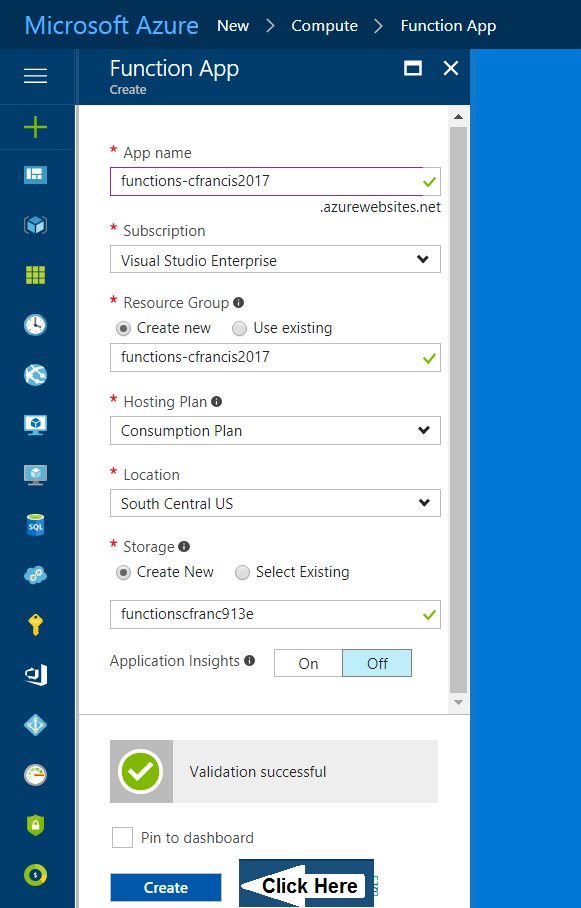
A new “Function App” creation dialogue box will ask you to name your application.  I called mine functions-cfrancis2017.  You can name your whatever you like.  

Also, keep the “Consumption Plan” selected as the “Hosting Plan”.  Azure provides two types of pricing in this category, including the Consumption Plan and the App Service Plan.  Here’s the difference between the two:

  • Consumption plan – When your function runs, Azure provides all of the necessary computational resources. You don’t have to worry about resource management, and you only pay for the time that your code runs.
  • App Service plan – Run your functions just like your web, mobile, and API apps. When you are already using App Service for your other applications, you can run your functions on the same plan at no additional cost.

Step4

STEP 5

Once you’re satisfied with the name of your “Function App”, then click the Create button at the bottom of the dialogue box.

Step5

STEP 6

You should now be able to find your new App Service and Storage Account in the Azure Portal.

Step6.png

STEP 7

Clicking on your function allow you to inspect its details.  You can even toggle your new Function App as a favorite by clicking on the star next to your new function.

Step7

STEP 8

Once you toggle it as your favorite, you can easily find it anytime you look through the Function Apps section of the Azure Portal.

Step8

STEP 9

Click on the following items to display more information about your new Function App or to drill down on the type of item you’d like to create under this category.

Step9

STEP 10

We want to create a new Azure Function that lives in our new Function App.  So, just:

  1. click on (+) next to the “Function” item.
  2. Choose the scenario you want.  I chose a “Webhook + API”
  3. Click on the “Create this function” button.

Step11

STEP 11

After you click on the “Create this function” in the previous example, the following code block will automatically display in the language you chose.  I chose JavaScript as my Webhook.

Step12

STEP 12

Click the “Run” button just to try it out.  Once you’re satisfied with the results, try running the Azure Function remotely.

Step13

STEP 13

To run it remotely, click on the “</> Get function URL” selection to bring up the Azure Function URL.  This is the restful service you will call to execute your new Azure Function.

Step14

STEP 14

Select the default (Function key) and review the results of the HTTP(S) call.

Step15

STEP 15

Do the following:

  1. Paste the link you just copied into a mainstream browser of your choice.
  2. Click the “Enter” key to navigate to the URL.
  3. Review the results.  They’re perfect!

Step16

STEP 16

Now you can go back into the Azure Portal and review the results for the calls that you (or anyone else) makes to your new Azure Function.

Step17

SUMMARY

From a primitive standpoint, that’s all there is to it.  Of course, I’ll provide a more complex implementation of one in a future article.

Hi, I’m Cole Francis, a Solution Architect for The PSC Group in Schaumburg, IL. I’ve been successfully designing, developing, and delivering custom software solutions for an impressive and extensive list of well-branded clients for over twenty years.

Thanks for reading and keep on coding! 😁

SQL Server Spatial

Author:  Cole Francis, Architect

THE PROBLEM

So, wrap your head around this for a minute.  Let’s suppose that you’re a small company that sells casualty insurance to property owners in South Florida.

Your business is thriving, but you feel like you’ve completely saturated the market in that region, so now you want to expand your offerings to a small territory in central Florida.

After conducting rigorous research on the demographic data, you realize that hurricane insurance along the central-east coast is white hot right now.  You conclude that this is the result of booming home turnovers within that area.

The demographic area that your team has decided to pursue starts at West Palm Beach and extends all the way down to Miami.  What’s more, most of the activity in the area appears to be occurring between the coast and 10 miles inland.

So, you assemble your Sales and Marketing Team, and you provide them with the results of your fact finding.  Then you ask them to formulate a strategy that will allow the company to maximize their insurance sales efforts within that area.

Days later, the team reassembles and tells you what they found out about the area.  It turns out they recommend targeting a small territory of homes, which have recently sold along the A1A in West Palm Beach along Ocean Blvd, suffering from sudden turnover.

The team also explains that the sudden turnover is predominantly due to a large concentration of aging homeowners in the area that are selling their large homes and are opting for smaller living arrangements.

Much to everyone’s glee, the area also comes with a strong per capita household income, has a low crime rate, and has an average occurrence of natural disasters.

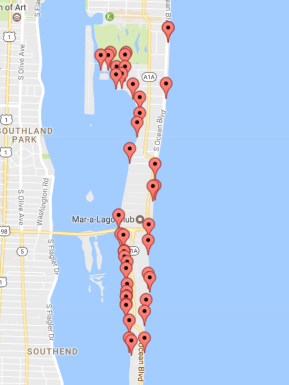
The entire team is excited about pursuing the new region per the demographic data, so their next step is to carefully map out the latitude/longitude coordinates of the area using their favorite mapping website.  Here are the coordinates they’ve used to construct their target market area.  Do you notice how they form a nice little polygon?

A1A

Next, you march down to the Palm Beach County Clerk’s Office and request an Excel Spreadsheet containing the addresses and latitude/longitude coordinates for all new and existing homes sales in the area for the past ninety days.

Of course, the spreadsheet the county offers lists far more addresses and geocoordinates than the small demographic region that your business is targeting.

Therefore, it’s up to your company to pare down the county’s results to only include addresses that are inside your target demographic polygon.  Realizing the manual complexity of this effort, you hand the data and other project artifacts over to your technical team to figure out.

Regardless, in most cases you can easily tell if a home’s latitude/longitude coordinates are well within the acceptable range by just visually inspecting them.

To this point, what I’m showing you in the picture below are the coordinates of those homes that are on the fringe of acceptability, meaning we can’t easily tell if the residences are inside or outside our target demographic polygon using a simple visual inspection.

Given this, you’ll need a quick way to process this data and pare the results down to only those households that the Sales and Marketing Team wants to pursue in the defined area.  So, how can you do this?

Well, you can either manually check them in Google Maps, but this would mean that you either have a really small set of data or a whole lot of time on your hands.  😁

Or, you can try a more automated approach using a platform like SQL Server.  Why SQL Server you ask?  The answer really lies in that there are two spatial data types in SQL Server that can help us quickly solve this problem.  The data types are called Geography and Geometry.

It’s important that you understand the difference between these two data type objects, including what they are and how they are used, because they’re similar but definitely not the same.

THE GEOGRAPHY DATATYPE

Although the geography data type sounds like the right fit for what we’re about to accomplish, it actually compounds the problem.  This is because the Geography data type is used for terrestrial spatial data covering the convex surface of the Earth.

Because of its ellipsoidal nature, any polygons that you use to define an area cannot exceed a single hemisphere and must specify the correct ring orientation.

It’s for these very reasons that simply drawing a polygon somewhere on its surface doesn’t give you enough information to make accurate determinations about geocoordinates that get fed into it.

For instance, if I were to draw an area around the Equator of the globe, and then I were to ask you if a specific latitude/longitude coordinate fell inside or outside the boundary I just drew, you wouldn’t have enough information to answer my question.

Why you might ask?  It’s because you would have to know if I was targeting the northern or southern ring of the Equator, the western or eastern hemisphere, and whether the polygon I constructed was meant to include or exclude the target latitude/longitude coordinates.

THE GEOMETRY DATATYPE

When I think of the SQL Server geometry data type and apply it to this problem, one of the first things that comes to my mind is a 1991 book, “Inventing the Flat Earth”, written by retired University of California Professor, Jeffrey Burton Russell.  In the book, Russell discusses how the “flat Earth” myth was disseminated by early 19th century writers like Antoinne-Jean Letronne, and others of course.

In the case of this data type, Microsoft SQL Server takes an opposite viewpoint of Russell.   Instead, they provide a geometry data type that allows us to construct the problem and solution using what you might think of as a “steroidal planar Earth object”, which conforms to the Open Geospatial Consortium (OGC).

I actually coined the term “Steroidal Flat Earth Object”, because the object’s range extends far beyond the -90 to 90 latitudes and -180 to 180 longitude maximums defining the Earth’s geographic range.

Because it’s just a very large, single-dimension plane, it’s not necessary to define if the target coordinates lie to the West or East of the Prime Meridian when using this data type.

However, there are still some basic rules that need to be followed in order to construct a well-formed polygon.  One is that the sequence order in which the vertices get added is important, just as I mentioned earlier in this article.  If you get the sequence wrong, then your polygon could have issues like the example shown below.

PolygonVertices

The other important rule is that you must make sure that your final coordinate is equal to your first coordinate in order to officially close the loop on your polygon.  If you don’t close the loop on the polygon, then SQL Server throws an error when you try to execute the code.

But, once you get things right, the result is a built-in SQL Server math function that offers an accurate determination on whether a point (i.e. a single coordinate) or a line (i.e. one or more coordinates) intersects or lies inside the perimeter of a well-defined polygon.

Pretty nifty, huh?  So, here’s the solution…

THE SOLUTION (COPY & PASTE THIS INTO SQL SERVER, AND THEN RUN IT)

--create a variable table
declare @coordinates table
(
id int identity (1,1),
coordinate geometry
)
declare @recordCount as int

-- @area represents the demographic area
-- *note: The sequence in how you add each point to construct
-- the polygon is very important.
declare @area as geometry

--turn off the verbose SQL Server logging
set nocount on

-- enter the fringe lat/long County coordinates into the table (this process would normally be automated).
insert into @coordinates (coordinate)
select geometry::Point(26.688379,-80.034762,4326)
insert into @coordinates (coordinate)
select geometry::Point(26.684662,-80.037804,4326)
insert into @coordinates (coordinate)
select geometry::Point(26.679250,-80.035808,4326)
insert into @coordinates (coordinate)
select geometry::Point(26.674490,-80.037095,4326)
insert into @coordinates (coordinate)
select geometry::Point(26.675722,-80.039778,4326)
insert into @coordinates (coordinate)
select geometry::Point(26.700533,-80.034413,4326)
insert into @coordinates (coordinate)
select geometry::Point(26.675402,-80.036230,4326)
insert into @coordinates (coordinate)
select geometry::Point(26.694902,-80.037331,4326)
insert into @coordinates (coordinate)
select geometry::Point(26.692697,-80.039852,4326)
insert into @coordinates (coordinate)
select geometry::Point(26.693809,-80.041225,4326)
insert into @coordinates (coordinate)
select geometry::Point(26.677084,-80.037010,4326)

-- set up the demographic area by constructing a polygon of coordinates.-- *note: the final coordinate MUST match the first coordinate in order-- to close the polygon.  If it’s left open, then it won’t work.
-- *note: the sequence of the coordinates used to construct the polygon is also important.
set @area = geometry::STGeomFromText('POLYGON(( 26.697583 -80.033367, 26.691103 -80.033635, 26.681781 -80.035083, 26.679250 -80.035094, 26.679116 -80.035287, 26.674653 -80.035791, 26.672870 -80.035952, 26.668939 -80.035920, 26.668498 -80.035748, 26.665876 -80.036177, 26.664601 -80.036467, 26.661456 -80.036467, 26.661101 -80.038184, 26.661417 -80.038431, 26.663517 -80.038420, 26.665228 -80.038855, 26.665391 -80.038791, 26.666254 -80.038855, 26.666340 -80.038764, 26.666891 -80.038764, 26.667706 -80.038657, 26.669571 -80.038802, 26.670300 -80.038684, 26.670923 -80.039001, 26.671575 -80.039108, 26.671652 -80.039044, 26.673430 -80.039151, 26.673507 -80.039516, 26.675731 -80.039773, 26.683496 -80.038325, 26.686564 -80.037338, 26.687676 -80.037005, 26.689516 -80.037048, 26.691011 -80.037863, 26.692219 -80.039322, 26.692161 -80.040084, 26.693081 -80.040041, 26.693110 -80.038957, 26.694452 -80.038914, 26.694682 -80.038807, 26.694720 -80.040910, 26.694375 -80.041125, 26.694394 -80.042058, 26.697583 -80.033367))', 4326)

select @recordCount = count(id) FROM @coordinates
while (@recordCount > 0)
begin 
     declare @forwardPoint geometry 
     declare @identity int 
     select Top(1) @identity=id, @forwardPoint=coordinate from @coordinates 
     set @forwardPoint = @forwardPoint.MakeValid();

     if (@forwardPoint.STIntersection(@area).ToString() <> 'GEOMETRYCOLLECTION EMPTY') and (@forwardPoint.STIntersection(@area).ToString() <> 'GEOMETRYCOLLECTION EMPTY') 
     begin 
          print 'Id ' + cast(@recordCount as varchar(10)) + ' is inside the target demographic area for lat/lng ' + cast(@forwardPoint as varchar(100)) 
     end 
     else 
     begin 
          print 'Id ' + cast(@recordCount as varchar(10)) + ' is outside the target demographic area for lat/lng ' + cast(@forwardPoint as varchar(100)) 
     end
     
     delete from @coordinates where id = @identity select @recordCount = count(id) FROM @coordinates
 end

-- turn verbose logging back on
set nocount on


THE END RESULT IS THIS

The Sales Team will now pursue every household (represented as a lat/lng coordinate below) that falls inside the target demographic area.  Coordinates that fall outside the target area will be ignored by the Sales Team for now:

Id 11 is inside the target demographic area for lat/lng POINT (26.688379 -80.034762)
Id 10 is inside the target demographic area for lat/lng POINT (26.684662 -80.037804)
Id 9 is inside the target demographic area for lat/lng POINT (26.67925 -80.035808)
Id 8 is inside the target demographic area for lat/lng POINT (26.67449 -80.037095)
Id 7 is outside the target demographic area for lat/lng POINT (26.675722 -80.039778)
Id 6 is outside the target demographic area for lat/lng POINT (26.700533 -80.034413)
Id 5 is inside the target demographic area for lat/lng POINT (26.675402 -80.03623)
Id 4 is inside the target demographic area for lat/lng POINT (26.694902 -80.037331)
Id 3 is inside the target demographic area for lat/lng POINT (26.692697 -80.039852)
Id 2 is outside the target demographic area for lat/lng POINT (26.693809 -80.041225)
Id 1 is inside the target demographic area for lat/lng POINT (26.677084 -80.03701)

For more information on Microsoft SQL Server Spatial Data Types, click here.

Hi, I’m Cole Francis, a Solution Architect for The PSC Group in Schaumburg, IL.  I’ve been successfully designing, developing, and delivering custom software solutions for an impressive and extensive list of well-branded clients for over twenty years.

Thanks for reading and keep on coding! 🙂

XFactor

By: Cole Francis, Architect, PSC, LLC


THE PROBLEM

So, what do you do when you’re building a website, and you have a long-running client-side call to a Web API layer. Naturally, you’re going to do what most developers do and call the Web API asynchronously.  This way, your code can continue to cruise along until a result finally return from the server.

But, what if matters are actually worse than that?  What if your Web API Controller code contacts a Repository POCO that then calls a stored procedure through the Entity Framework.  And, what if the Entity Framework leverages a project dedicated database, as well as a system-of-record database, and calls to your system-of-record database sporadically fail?

Like most software developers, you would lean towards looking at the log files, offering traceability and logging for your code.  But, what if there wasn’t any logging baked into the code?  Even worse, what if this problem only occurred sporadically?  And, when it occurs, orders don’t make it into the system-of-record database, which means that things like order changes and financial transactions don’t occur.  Have you ever been in a situation like this one?


PART I – HERE COMES ELMAH

From a programmatic perspective, let’s hypothetically assume that the initial code had the controller code calling the repository POCO in a simple For/Next loop that iterates a hardcoded 10 times.  So, if just one of the 10 iterating attempts succeeds, then it means that the order was successfully processed.  In this case, the processing thread would break free from the critical section in the For/Next loop and continue down its normal processing path.  This, my fellow readers, is what’s commonly referred to as “Optimistic Programming”.

The term, “Optimistic Programming”, hangs itself on the notion that your code will always be bug-free and operate on a normal execution path.  It’s this type of programming that provides a developer with an artificial comfort level.  After all, at least one of the 10 iterative calls will surely succeed.  Right?  Um…right?  Well, not exactly.

Jack Ganssle, from the Ganssle Group, does an excellent job explaining why this development approach can often lead to catastrophic consequences.  He does this in his 2008 online rant entitled, “Optimistic Programming“.  Sure, his article is practically ten years old at this point, but his message continues to be relevant to this very day.

The bottom line is that without knowing all of the possible failure points, their potential root cause, and all the alternative execution paths a thread can tread down if an exception occurs, then you’re probably setting yourself up for failure.  I mean, are 10 attempts really any better than one?  Are 10,000 calls really any better than 10?  Not only are these flimsy hypothesis with little or no real evidence to back them up, but they further convolute and mask the underlying root cause of practically any issue that arises.  The real question is, “Why are 10 attempts necessary when only one should suffice?”

So, what do you do in a situation when you have very little traceability into an ailing application in Production, but you need to know what’s going on with it…like yesterday!  Well, the first thing you do is place a phone call to The PSC Group, headquartered in Schaumburg, IL.  The second thing you do is ask for the help of Blago Stephanov, known internally to our organization as “The X-Factor”, and for a very good reason.  This guy is great at his craft and can accelerate the speed of development and problem solving by at least a factor 2…that’s no joke.

In this situation, Blago recommends using a platform like Elmah for logging and tracing unhandled errors.  Elmah is a droppable, pluggable logging framework that dynamically captures all unhandled exceptions.  It also offers color-coded stack traces with line numbers that can help pinpoint exactly where the exception was thrown.  Even more impressive, its very quick to implement and requires low personal involvement during integration and setup.  In a nutshell, its implementation is quick and it makes debugging a breeze.

Additionally, Elmah comes with a web page that allows you to remotely view the unhandled exceptions.  This is a fantastic function for determining the various paths, both normal and alternate, that lead up to an unhandled error. Elmah also allows developers to manually record their own information by using the following syntax.

ErrorSignal.FromCurrentContext().Raise(ex);


Regardless, Elmah’s capabilities go well beyond just recording exceptions. For all practical purposes, you can record just about any information you desire. If you want to know more about Elmah, then you can read up on it by clicking here.  Also, you’ll be happy to know that you can buy if for the low, low price of…free.  It just doesn’t get much better than this.


PART II – ONE REALLY COOL (AND EXTREMELY RELIABLE) RE-TRY PATTERN

So, after implementing Elmah, let’s say that we’re able to track down the offending lines of code, and in this case the code was failing in a critical section that iterates 10 times before succeeding or failing silently.  We would have been very hard-pressed to find it without the assistance of Elmah.

Let’s also assume that the underlying cause is that the code was experiencing deadlocks in the Entity Framework’s generated classes whenever order updates to the system-of-record database occur.  So, thanks to Elmah, at this point we finally have some decent information to build upon.  Elmah provides us with the stack trace information where the error occurred, which means that we would be able to trace the exception back to the offending line(s) of code.

After we do this, Blago recommends that we craft a better approach in the critical section of the code.  This approach provides more granular control over any programmatic retries if a deadlock occurs.  So, how is this better you might ask?  Well, keep in mind from your earlier reading that the code was simply looping 10 times in a For/Next loop.  So, by implementing his recommended approach, we’ll have the ability to not only control the number of iterative reattempts, but we can also control wait times in between reattempted calls, as well as the ability to log any meaningful exceptions if they occur.


       /// <summary>
       /// Places orders in a system-of-record DB
       /// </summary>
       /// <returns>An http response object</returns>
       [HttpGet]
       public IHttpActionResult PlaceOrder()
       {
           using (var or = new OrderRepository())
           {
               Retry.DoVoid(() => or.PlaceTheOrder(orderId));
               return Ok();
           }
       }


The above Retry.DoVoid() method calls into the following generic logic, which performs its job flawlessly.  What’s more, you can see in the example below where Elmah is being leveraged to log any exceptions that we might encounter.


using Elmah;
using System;
using System.Collections.Generic;
using System.Linq;
using System.Text;
using System.Threading;
using System.Threading.Tasks;

namespace PSC.utility
{
   /// <summary>
   /// Provides reliable and traceable retry logic
   /// </summary>
   public static class Retry
   {
       /// <summary>
       /// Retry logic
       /// </summary>
       /// <returns>Fire and forget</returns>
       public static void DoVoid(Action action, int retryIntervallInMS = 300, int retryCount = 5)
       {
           Do<object>(() =>
           {
               action();
               return null;
           }, retryIntervallInMS, retryCount);
       }

       public static T Do<T>(Func<T> action, int retryIntervallInMS = 300, int retryCount = 5)
       {
           var exceptions = new List<Exception>();
           TimeSpan retryInterval = TimeSpan.FromMilliseconds(retryIntervallInMS);

           for (int retry = 0; retry < retryCount; retry++)
           {
               bool success = true;

               try
               {
                   success = true;

                   if (retry > 0)
                   {
                       Thread.Sleep(retryInterval);
                   }
                   return action();
               }
               catch (Exception ex)
               {
                   success = false;
                   exceptions.Add(ex);
                   ErrorSignal.FromCurrentContext().Raise(ex);
               }
               finally
               {
                   if (retry > 0 && success) {
                       ErrorSignal.FromCurrentContext().Raise(new Exception(string.Format("The call was attempted {0} times. It finally succeeded.", retry)));
                   }
               }
           }
           throw new AggregateException(exceptions);
     }
   }
}

As you can see, the aforementioned Retry() pattern offers a much more methodical and reliable approach to invoke retry actions in situations where our code might be failing a few times before actually succeeding.  But, even if the logic succeeds, we still have to ask ourselves questions like, “Why isn’t one call enough?” and “Why are we still dealing with the odds of success?”

After all, not only do we have absolutely no verifiable proof that looping and reattempting 10 times achieves the necessary “odds of success”.  Therefore, the real question is why there should there be any speculation at all in this matter?  After all, we’re talking about pushing orders into a system-of-record database for revenue purposes, and the ability to process orders shouldn’t boil down to “odds of success”.  It should just work…every time!

Nonetheless, what this approach will buy us is one very valuable thing, and that’s enough time to track down the issue’s root cause.  So, with this approach in place, our number one focus would now be to find and solve the core problem.


PART III – PROBLEM SOLVED

So, at this point we’ve relegated ourselves to the fact that, although the aforementioned retry logic doesn’t hurt a thing,  it masks the core problem.

Blago recommends that the next step is to load test the failing method by creating a large pool of concurrent users (e.g. 1,000) all simulating the order update function at the exact same time.  I’ll also take it one step further by recommending that we also need to begin analyzing and profiling the SQL Server stored procedures that are being called by the Entity Framework and rejected.

I recommend that we first review the execution plans of the failing stored procedures, making sure their compiled execution plans aren’t lopsided.  if we happen to notice that too much time is being spent on individual tasks inside the stored procedure’s execution plan, then our goal should be to optimize them.  Ideally, what we want to see is an even distribution of time optimally spread across the various execution paths inside our stored procedures.

In our hypothetical example, we’ll assume there are a couple of SQL Server tables using complex keys to comprise a unique record on the Order table.

Let’s also assume that during the ordering process, there’s a query that leverages the secondary key to retrieve additional data before sending the order along to the system-of-record database.   However, because the complex keys are uniquely clustered, getting the data back out of the table using a single column proves to be too much of a strain for the growing table.  Ultimately, this leads to query timeouts and deadlocks, particularly under load.

To this end, optimizing the offending stored procedures by creating a non-clustered, non-unique index for the key attributes in the offending tables will vastly improve their efficiency.  Once the SQL optimizations are complete, the next step should be to perform more load tests and to leverage the SQL Server Profiling Tool to gauge the impact of our changes.  At this point, the deadlocks should disappear completely.


LET’S SUMMARIZE, SHALL WE

The moral of this story is really twofold.  (1) Everyone should have an “X-Factor” on their project; (2) You can’t beat great code traceability and logging in a solution. If option (1) isn’t possible, then at a minimum make sure that you implement option (2).

Ultimately, logging and traceability help out immeasurably on a project, particularly where root cause analysis is imperative to track down unhandled exceptions and other issues.  It’s through the introduction of Elmah that we were able to quickly identify and resolve the enigmatic database deadlock problems that plagued our hypothetical solution.

Regardless, while this particular scenario is completely conjectural, situations like these aren’t all that uncommon to run across in the field.  Regardless, most of this could have been prevented by following Jack Ganssule’s 10-year old advice, which is to make sure that you check those goesintas and goesoutas!  But, chances are that you probably won’t.

Thanks for reading and keep on coding! 🙂

productdelivery

By:  Cole Francis, Solution Architect at The PSC Group, LLC, Schaumburg, IL.

Today’s successful IT Delivery Leaders focus predominantly on the delivery of a “product” and focus less on the term “project”.  They despise heavy planning phases that require intense requirements gathering sessions, they avoid meetings that they know will produce unactionable results, they redirect unnecessary project drama and chaos, they address unmanageable timelines, and they shy away from creating redundant product artifacts that tell a story that’s already been told.

Today’s successful IT Delivery Leaders are all about orchestrating results in rapid successions to demonstrate quick and frequent progress to the Stakeholders, they manage realistic expectations across the entire Delivery Team, they allow a product and its accompanying artifacts to define themselves over a series of iterative sprints, and they work directly with the Stakeholders to help shape the final product.  That’s efficiency!  Hi, I’m Cole Francis, a Solution Architect at The PSC Group in Schaumburg, IL, and I’ve been successfully delivering custom software solutions for an impressive and growing list of well-branded clients for over twenty years.

meetup

Please join me, Cole Francis, when I speak at “Dev Ops in the Burbs” on Thursday, February 2nd, at the NIU Conference Center in Naperville, IL at 6pm sharp.  During my hour-long presentation, I’ll discuss and demonstrate how to navigate and use the comprehensive cloud-based Microsoft Visual Studio Team Services (VSTS) platform.

I’ll also talk about how I use this platform’s built-in tools and capabilities to manage my SCRUM-based Agile projects and teams, such as:  Product Backlog Items and the Kanban Board, capacity planning and management, sprint planning, and setting up a project’s areas and iterations.  I’ll also discuss general team management using the SCRUM-based Agile approach, including how to conduct your team and product stakeholder meetings.

Additionally, I’ll also talk about how your team should estimate the level-of-effort for PBI’s, and how those items should be prioritized and monitored during the course of the project.What’s more, I’ll also help you understand how to forecast when your project will be done based upon your team’s ever-fluctuating velocity and capacity.

Finally, I’ll also cover bug entry and management, PBI prioritization, when you might consider breaking PBI’s into more discrete tasks, when an epic should be used on the project, basic VSTS security, Visual Studio source code integration, how to customize the project home page, how to set up custom queries and alerts, and how to automate the build & deployment processes.

It sounds like a lot of information…and geez…it is.  🙂  I’m pretty sure that I could talk for at least a day on this platform, so I’ll have quite a bit of ground to cover in a very short amount of time, but I think I can do it.  However, just in case I can’t, please bring a sleeping bag, a change of clothes, and a day’s worth of food and water with you. 🙂  In all seriousness though, it should be a very fun and educational evening.  I look forward to seeing everyone there.  Please join me.  Click here for more details.

Organized by Craig Jahnke and Tony Hotko.

meetupJoin me, Cole Francis, as I speak at the Dev Ops in the Burbs inaugural meeting on Thursday, November 3rd, in Naperville, IL. During my 30-minute presentation, I’ll discuss and demonstrate how to create and deploy a Microsoft .NET Core application to the Cloud using Docker Containers.  It should be a fun and educational evening.  I look forward to seeing you there.

Organized by Craig Jahnke and Tony Hotko.

Containers.png

Click Here to Download My Dockerized .NET Core Solution

Author:  Cole Francis, Architect

Preface

Before I get embark on my discussion on Docker Containers, it’s important that I tell you that my appreciation for Docker Containers stems from an interesting conversation I had with a very intelligent co-worker of mine at PSC, Norm Murrin.  Norm is traditionally the guy in the office that you go to when you can’t figure something out on your own.  The breadth and depth of his technical capabilities is absolutely amazing.  Anyway, I want to thank him for the time he spent getting me up-to-speed on them, because frankly put, Containers are really quite amazing once you understand their purpose and value.  Containerization is definitely a trend your going to see used a lot more in the DevOps community, and getting to understand them now will greatly benefit you as their use becomes much more mainstream in the future.  You can navigate to Norm Murrin’s blog site by clicking here.

The Origins of OSVs

“Operating System Virtualization”, also known as OSV, was born predominantly out of a need for infrastructure teams to balance large numbers of users across a restrictive amount of physical hardware.  Virtualizing an operating system entails creating isolated partitions representing a physical instance of a server, and then virtualizing it into multiple isolated partitions that replicate the original server.  

Because the isolated partitions use normal operating system call interfaces, there’s no need for them to be emulated or executed by an intermediate virtual machine.  Therefore, the end result is that running the OSV comes with almost no overhead.  Other immediate benefits include:

  • It streamlines your organization’s machine provisioning processes,
  • It improves your organization’s applications availability and scalability,
  • It helps your organization create bullet-proof disaster recovery plans,
  • It helps reduce costly on-prem hardware vendor affinities.

What’s more, the very fact that your company is virtualizing its servers and moving away from bare metal hardware systems probably indicates that it’s not only trying to address some of the bullet-point items I’ve previously mentioned, but it’s also preparing for a future cloud migration.

The Difference Between a VM and an OSV

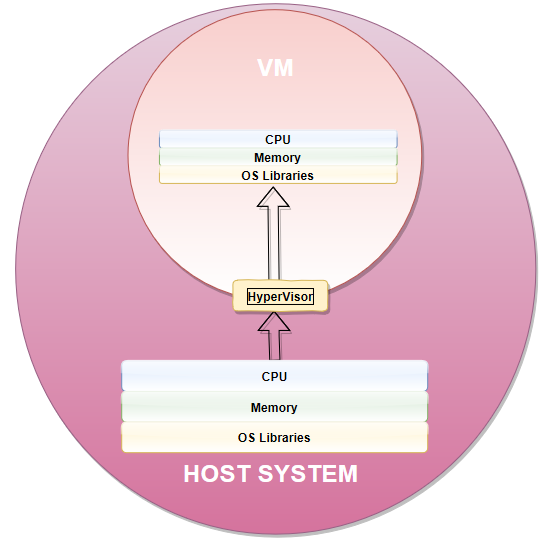
Virtual machines, or VMs, require that the guest system and host system each have their own operating system, libraries, and a full memory instance in order to run in complete isolation.  In turn, communication from the guest and host systems occurs in an abstracted layer known as the hypervisor.

Granted, the term “hypervisor” sounds pretty darn cool, but it’s not entirely efficient.  For instance, starting and stopping a VMs necessitates a full booting process and memory load, which significantly limits the number of software applications that can reside on the host system.  In most cases, a VM supports only one application.
hypervisor

On the contrary, OSVs offer incredibly lightweight virtual environments that incorporate a technique called “namespace isolation”.  In the development community, we commonly refer to namespace isolation as “Containers”, and it’s this container level-of-isolation that can allows hundreds of anonymous containers to live and run side-by-side with one another, in complete anonymity of one another, on a single underlying host system.

NamespaceIsolation.png

The Advantages of Using Containers

One interesting item to note is that because Containers share resources on the same host system they operate on, there is often cooperative governance in place that allows the host system to maximize the efficiency of shared CPU, memory, and common OS libraries as the demands of the Containers continually change.

Cooperative governance accomplishes this by making sure that each container is supplied with an appropriate amount of resources to operate efficiently, while at the same time not encroaching on the availability of resources required by the other running containers.  It’s also important to point out that this dynamic allocation of resources can be manually overridden.

  1. Cooperative Governance – Doesn’t require any sort of finite resource limitations or other impositions by the host.  Instead, the host dynamically orchestrates the reallocation of resources as the ongoing demand changes.
  2. Manual Governance – A Container can be limited so it cannot consume more than a certain percentage of the CPU or memory at any given time.

Other great advantages that Containers have over bare metal virtual machines are:

  1. You don’t have to install an operating system on the Container system.
  2. You also don’t have to get the latest patches for a Container system.
  3. You don’t have to install application frameworks or third-party dependency libraries.
  4. You don’t have to worry about networking issues.
  5. You don’t have to install your application on a Container system.
  6. You don’t have to configure your application so that it works properly in your Container.

All of the abovementioned concerns are handled for you by the sheer nature of the Container.

Are There Any Disadvantages

While the advantages are numerous, there are some disadvantages to be aware of, including:

  1. Containers are immutable
  2. Containers run in a single process
  3. If you’re using .NET Core as your foundation, you’ll only have access to a partial feature set…for now anyway.
  4. There are some security vulnerabilities that you’ll want to be aware of, like large attack surfaces, operating system fragmentation, and virtual machine bloat.
  5. Because this is such a new technical area, not all third-party vendors offer support for Core applications.  For example, at this point in time Oracle doesn’t offer Core capabilities for Entity Framework (EF).  See more about this by clicking here.

Are VMs Dead

The really short answer is, “No.”  Because Containers (OSVs) have so many advantages over VMs, the natural assumption is that VMs are going away, but this simply isn’t true.

In fact, Containers and VMs actually complement one another.  The idea is that you do all of the setup work one-time on an image that includes all of your dependencies and the Docker engine, and then you have it host as many Containers as you need.  This way you don’t have to fire up a separate VM and operating system for each application being hosting on the machine.

Like I mentioned in an earlier section, OSVs offer incredibly lightweight virtual environments that incorporate a technique known as “namespace isolation”, which ultimately allows containers to live and run alongside each other, and yet completely autonomously from one another, on the same host system.

Therefore, in most practical cases it will probably make sense for the underlying host system to be a VM.

Containers as Microservices

Containers can house portions of a solution, for example just the UI layer.  Or, they can store an entire solution, from the UI to the database, and everything in between.  One of the better known uses for Containers is “Micro Services”, where each container represents a separate layer of a subsystem.

What’s more, scaling the number of containers instances to meet the demands of an environment is fairly trivial.  The example below depicts a number of containers being scaled up to meet the demands of a Production environment versus a Test environment.   This can be accomplished in a few flips of a switch when a Container architecture is designed correctly.  There are also a number of tools that you can use to create Containers, or even an environment full of Containers, such as Docker and Docker Cloud.

TEST ENVIRONMENT

ContainersEnviroQA.png

PRODUCTION ENVIRONMENT

ContainersEnviroProd.png

What is Docker?

Docker is an OSV toolset that was initially released to the public on September 16, 2013.  It was created to support Containerized applications and it doesn’t include any bare-metal drivers.

Therefore, Containers are incredibly lightweight and serve as a universal, demand-based environment that both shares and reallocates pools of computing resources (e.g., computer networks, servers, storage, applications and services) as the environmtal demand changes.  

Finally, because of their raw and minimalistic nature, Containers can be rapidly provisioned and released with very little effort.

Build it and They Will Come

Lets’s go ahead and deploy our Containerized .NET Core solution to Docker Cloud.  We’re going to use Docker Cloud as the Primary Cloud Hosting Provider and Microsoft Azure as the Emergency Backup System (EBS), Cloud Hosting Provider.  Not only that, but we’re going to deploy and provision all of our new resources in the Docker Cloud and Microsoft Azure in a span of about 15 minutes.

You probably think I’m feeding you a line of B.S.  I’m not offended because if I didn’t know any better I would too.  This is why I’m going to show you, step-by-step, how we’re going to accomplish this together.

Of course, There are just a few assumptions that I’ll make before we get started.  However, even if I assume incorrectly, I’ll still make sure that you can get through the following step-by-step guide:

  1. Assumption number one:  I’m going to assume that you already have a Microsoft Azure account set up.  If you don’t, then it’s no big deal.  You can simply forgo the steps that use Azure as an “Emergency Backup Site”.    You’ll still get the full benefit of deploying to the Docker Cloud, which still covers most deployment scenarios.
  2. Assumption number two:  I’m going to assume that you already have Docker for Windows installed.  If not, then you can get it for free here.
  3. Assumption number three:  I’m going to assume that you already have a Containerized application.  Again, if you don’t, then it’s no big deal.  I’m going to give you a couple of options here.  One option is that you can use my previous post as a way to quickly create a Containerized application.  You can get to my previous post by clicking here.

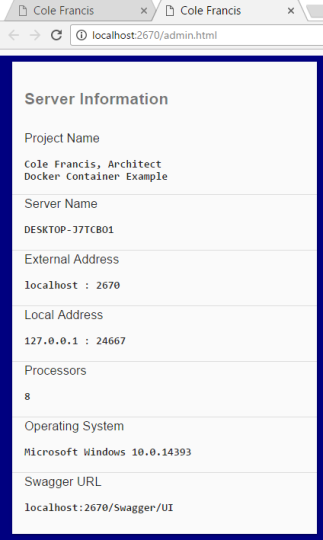
Another option you can explore is downloading the Dockerized .NET Core solution that I created on my own and made available to you at the top of this page.  Basically, it’s a .NET Core MVC application, which comes with a static Admin.html page and uses AngularJS and Swagger under the hood.  Through a little bit of manipulation, I made it possible for you to visualize certain aspects of the environment that your Containerized application is being hosted in, such as the internal and external IP addresses, the operating system, the number of supporting processors, etc.

Furthermore, it also incorporates a standard Web API layer that I’ve Swashbuckled and Swaggered, so you can actually make external calls to your Containerized application’s Rest API methods while it’s being hosted in the Cloud.

Finally, I’ve already included a Dockerfile in the solution, so all of your bases should be covered as I navigate you through the following steps.  I’ll even show it working for me, just like it should work for you.  Let’s get started…

STEP 1 – If you don’t already have a Docker Cloud account, then you can create one for free by clicking here.

step-1

STEP 2 – Setup your image repository.

step-2

STEP 3 – Add yourself as a Contributor to the project, as well as anyone else you want to have access to your repository.

step-2a-be-a-contributor

STEP 4 – Open Microsoft PowerTools or a command prompt and navigate to the project directory that contains the Dockerfile.  Look for it at the project level.

step-3-build-docker-project

STEP 5 – Build the Container image using Docker.  If you look at the pictorial above, you’ll see that I used the following command to build mine (**NOTE:  You will need to include both the space and period at the end of the command):

docker build -t [Your Container Project Name Here] .

step-4-finished-building-docker-project

STEP 6 – If everything built fine, then you’ll be able to see the image you just created by running the following command:

docker images

step-5-showing-newly-built-image

STEP 7 – Unless you’re already running a Container, then your running Containers should obviously be empty.  You can verify this by running the following command:

docker ps

step-6-dockercontainers-before

STEP 8 – Run the new Docker image that you just created.  You’ll do this by running the following Docker command:

docker run -d -p 8080:80 [Your Container Project Name Here]

step-7-creating-a-docker-container

STEP 9 – Review the Container you’re now running by using the following command.  If everything went well, then you should see your new running container:

docker ps

step-8-displaying-the-new-docker-container

STEP 10a – Open a browser and test your running Docker Containerized application.  **Note that neither IIS or self-hosting isn’t used.  Don’t run it in a Visual Studio IDE.  Also note that the supporting OS is Linux and not Windows.

step-9-running-the-new-docker-container

STEP 10b – Now run it in a Visual Studio IDE and denote the differences (e.g. Server Name, extern al listening port, the number of processors, and the hosting operating system.
step-10-running-the-app-out-of-visual-studio-2015

STEP 11 – Log into the Docker Cloud from PowerShell or a command prompt using the following command:

docker login

step-11-docker-login-script

STEP 12 – Tag your container repository:

docker tag webapi supercole/dockerrepository:webapi

step-12-tag-your-docker-image

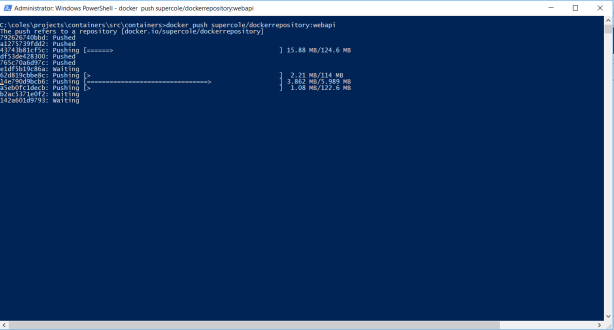
STEP 13 – Push your local container into the Docker Repository using the following command:

docker push supercole/dockerrepository:webapi
step-13-upload-your-image-using-tag

STEP 14 – Review the progress of your pushed container to the Docker repository.

step-14-upload-to-docker-success

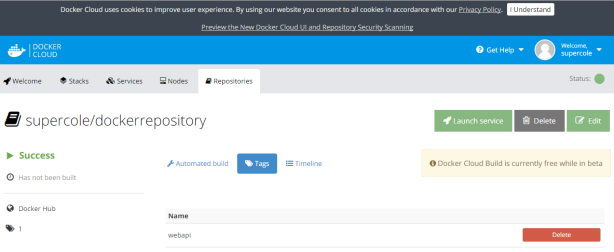
STEP 15 – Review your Docker repository and the tag you previously created for it in Docker Cloud.
step-15-container-and-tag-in-docker

STEP 16 – Create the Docker Cloud service from your pushed container image.

step-16-start-service-in-docker-hub

STEP 17 – Review the defined environment variables for your service.

step-17-adding-options-to-start-docker-hub-service

STEP 18 – Add a volume (optional).

step-18-add-a-volume

STEP 19 – Select the number of Containers you want to host.

step-19-creating-the-service

STEP 20 – Specify a Cloud Hosting Provider.  I chose Microsoft Azure, because I already have an Azure account.  Anyway, it will ask you to enter your credentials, and it will spit out a signed certificate that you’ll use to create a one-way trust between Docker Cloud and Azure.

step-20-creating-a-docker-cert-and-affinitizing-to-azure

STEP 21 – In Microsoft Azure, I uploaded the Docker Cloud certificate in order to create the trust.

step-20a-management-settings-create-docker-to-azure-certificate-trust-account

STEP 22 – Go back to the Docker Cloud and launch your first node.

step-21-launching-my-first-node-to-azure

STEP 23- This step can take awhile, because it goes through the process of both provisioning, uploading, and activating your Docker Cloud container in Microsoft Azure.

step-22-create-a-node-cluster

STEP 24- After the provisioning and deploying process completes, review your Azure account for the new Docker resources that were created.

Step 23 - Starting to Deploy to Azure from Docker.png

STEP 25 – You can also review the Docker Cloud Node timeline for all the activities that are occurring (e.g., Provisioning, setting up the network, deploying, et al).

step-24-monitoring-the-azure-provision-process

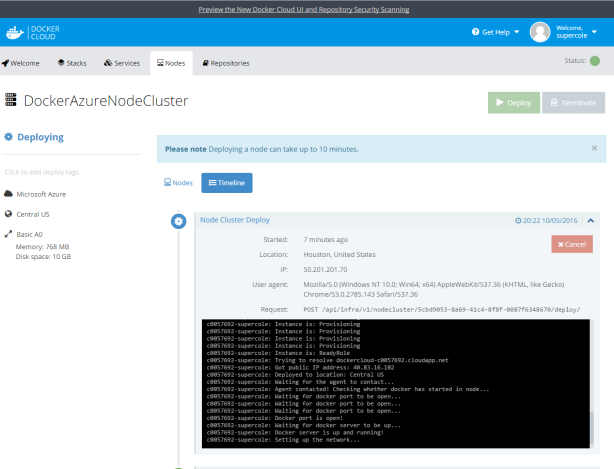
STEP 26- Finishing up the Docker Cloud to Azure deployment.
step-25-azure-finishing-up-the-docker-provisioning-process

STEP 27- The deployment successfully completed!

step-26-volume-complete

STEP 28- Launch your new service from your Docker Cloud Container repository.

step-27-launch-the-repository

STEP 29 – Wait for it…

step-28-launching-the-service

STEP 30a – Try out your hosted Docker Container in Docker Cloud.

dockersuccess

STEP 30b – Try out your hosted Docker Container in Microsoft Azure.
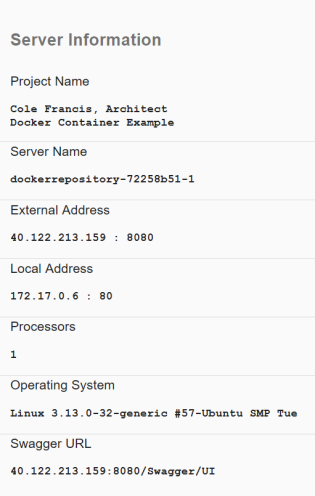
AzureSuccess.png

Thanks for reading and keep on coding! 🙂


sqltitle

Author: Cole Francis, Architect

THE PROBLEM

I was recently tasked with restoring a 220GB SQL Server backup file using SQL Server 2014 Management Studio (SSMS), and the database server I was restoring the backup to was very limited on space.  So, we threw the SQL backup file on a UNC share with an abundance of space, and I conveniently mapped a drive to the UNC share on the database server.

THE SOLUTION

Unfortunately, when it came time to restore the SQL backup file in SSMS, I was unable to see the newly mapped drive in SSMS, even though I could plainly see it in a File Explorer window.  So, to get around this little problem, I ran the following SQL commands, and now the mapped drive shows up properly in SSMS:


-- Turn on the advanced options
exec sp_configure 'show advanced options', 1
go
reconfigure
go

-- Reconfigure the advanced options values and enable the command shell
exec sp_configure 'xp_cmdshell', 1
go
reconfigure
go

-- Force SSMS to display the mapped drive
exec xp_cmdshell 'net use Z: \\YourNetworkFolder\YourSubFolder\YourSubSubFolder YourPassword /user:YourDomainName\YourUserName'


Thanks for reading and keep on coding! 🙂

CreativeIntegrationIoT.png


Author:  Cole Francis, Architect


BACKGROUND

This weekend I picked up a Raspberry Pi 3 Model B, which is the last single-board computer from the Raspberry Pi Foundation. The Model B’s capabilities are quite impressive. For instance, it’s capable of streaming BluRay-quality video, and its 40-pin GPIO header gives you access to 27 GPIO, UART, I2C, SPI as well as both 3.3V and 5V power sources. It also comes with onboard Wi-Fi and Bluetooth, all in a compact unit that’s only slightly larger than a debit card.

What’s more, I also purchased a 7″ touch display that plugs right in to the Raspberry Pi’s motherboard.  I was feeling creative, so I decided to find a way to take the technical foundation that I came up with in my previous article and somehow incorporate the Pi into that design, essentially taking it to a whole new level.  If you read my previous article, then you already know that my original design looks like this:

Microsoft Flow

Basically, the abovementioned design workflow represents a Microsoft Office 365 Flow component monitoring my Microsoft Office 365 Exchange Inbox for incoming emails. It looks for anything with “Win” in the email subject line and automatically calls an Azure-based MVC WebAPI endpoint whenever it encounters one.  In turn, the WebAPI endpoint then calls an internal method that sends out another email to User 2. 

In any event, I created the abovementioned workflow to simply prove that we can do practically anything we want with Microsoft Flow acting as a catalyst to perform work across disparate platforms and codebases.

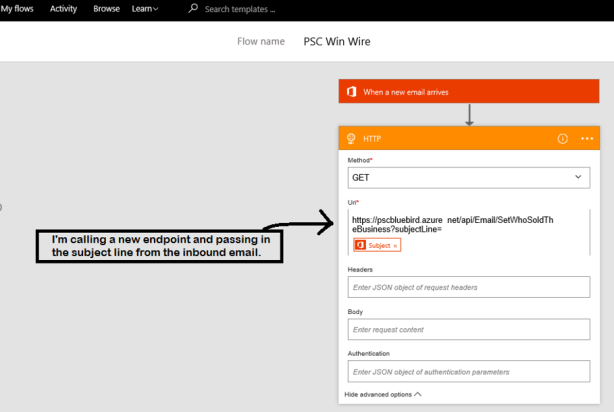
However, now I’m going to alter the original design workflow just a bit.  First, I’m going to change the Microsoft Flow component to start passing in email subject lines into our Azure-based WebAPI endpoint.  Secondly, I’m eliminating User 2 and substituting this person with the Raspberry Pi 3 IoT device running on a Windows 10 IoT Core OS. Never fear, in this article I’m also going to provide you with step-by-step instructions on how to install the OS on a Raspberry Pi 3 device.  Also, from this point on I’m going to refer to the Raspberry Pi 3 as “the Pi” just because it’s easier.

Once again, if you read my previous article, then you already know that the only time the Microsoft Flow component contacts the WebAPI is if an inbound email’s subject line matches the criteria we setup for it in Microsoft Flow.  In our new design, our Flow component will now pass the email subject line to a WebAPI enpoint, which will get enqueued in a static property in the cloud.

Separately, the Pi will also contact the Azure-hosted WebAPI endpoint on a regularly scheduled interval to see if an enqueued subject is being stored.  If so, then the Pi’s call to the WebAPI will cause the WebAPI to dequeue the subject line and return it to the Pi.  Finally, the Pi will interrogate the returned subject line and perform an automated action using the returned data.  The following technical design workflow probably lays it out better than I can explain it.

FlowDesign2.png


SOLUTION

Our solution will take us through a number of steps, including:

  1. Installing Microsoft Windows 10 IoT Core on the Pi.
  2. Modifying the Microsoft Flow component that we created in the previous article.
  3. Modifying the Azure-based (cloud) WebAPI2 project that I created in my previous article on Microsoft Flow.
  4. Creating a new Universal Windows Application that will reside on the Pi.

So, let’s get started by first setting up the Pi and installing Microsoft 10 IoT Core on it. We’re going to build our own little Smart Factory.


SETTING UP THE RASPBERRY PI 3

First, we’ll need to download the tools that are necessary to get the Windows IoT Core on the Pi.  You can get them here:

https://developer.microsoft.com/en-us/windows/iot/Downloads.htm

After we download the abovementioned tools, we’ll install them on our laptop or desktop.  Then we’ll be presented with the following wizard that will help guide us through the rest of the process.  The first screen that shows up is the “My devices” screen.  As you can see, it’s blank, and I can honestly say that I’ve never seen anything filled in this portion of the wizard, so you can ignore this section for now.  At this point, let’s sign into our Microsoft MSDN account and begin navigating through the wizard.

IoTWizard1

We can move onto the “Setup a new device” at this point:

IoTWizard2.png

Once we’re done adding our options, click the download and Install button in the lower right-hand corner of the screen.  It prompts us to enter an SD card if we haven’t already.

***A small word of caution***  The Raspberry Pi 3 uses a MicroSD card to host its operating system on, so take that into consideration when shopping for SD Cards.  What you’ll probably want to get is a MicroSD with a regular SD card adapter.  That’s what I did.  You’ll also want to study the SD Cards that Microsoft recommends for compatibility.  I unsuccessfully burnt through three SD cards before I gave up and went with their recommendation.  After conceding and going with a compatible SD card, I was able to render the Windows 10 IoT Core OS successfully, so don’t make the same costly mistake I made. 

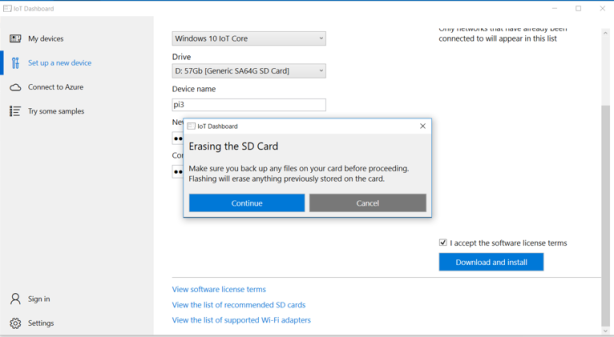
Anyway, we’ll eventually get to the point where we’re asked to erase the data on the SD card we’ve inserted.  This process deletes all existing data on our SD card, formats it using a FAT32 file system, and then installs the Windows 10 IoT Core image on it.

IoTWizard4.png

You should see the following screen when the wizard starts copying the files onto the SD card:

IoTWizard5.png

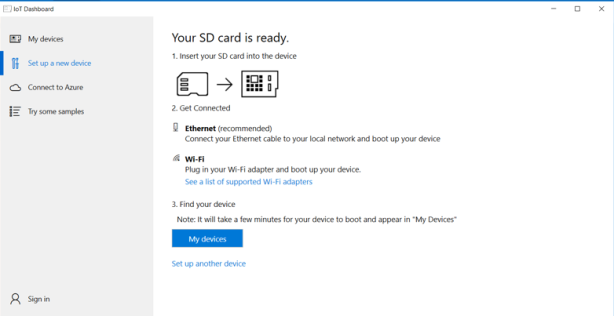
Our SD card is finally ready for action.

IoTWizard6.png

At this point, we can remove the SD Card Adapter from our laptop or desktop, and also remove the micro SD card from the SD Card Adapter.  Next, insert the micro SD card into the Pi’s miniSD port and then boot it up.

Afterwards, we’ll connect an Ethernet cable from our laptop (or optionally a desktop) to the Ethernet port on the Raspberry Pi.  Then we’ll run the following command using the Pi’s local IP address.  For example, my Pi’s IP address is 169.254.16.5, but your Pi’s IP address might be different, so pay close attention to this detail.

Anyway, this sets the Pi up as a Remote Managed Trusted Host and allows us to administer it from our local machine, which in this case is a laptop.  So, now we should be able to deploy our code to the Pi and interact with in Visual Studio 2015 debug mode.

IoTWizard7.png

At this point, all of the heavy lifting for the Pi’s OS installation and communication infrastructure is complete.


MODIFYING OUR EXISTING MICROSOFT FLOW COMPONENT

So, let’s piggyback off of the previous article I wrote about on Microsoft Flow and extend it to incorporate a Pi into the mix.  But, before we do, let’s tweak our Microsoft “PSC Win Wire” Flow component just a bit, since our new design goal is to start passing in the subject line of an inbound email to an Azure-hosted WebAPI endpoint.  If you recall, in the previous article we were simply calling a WebAPI endpoint without passing a parameter.  So, let’s change the “PSC Win Wire” Flow component so that we can start passing an email subject line to a WebAPI endpoint.  We’ll accomplish this by making the changes you see in the picture below.

IoTWizard8.png

We’re now officially done with the necessary modifications to our Microsoft Flow component, so let’s save our work.

Once again, it’s the Flow component’s job is to continually monitor our email inbox for any emails that match the conditions that we set up, which in this case are if “PSC Win Wire” is included in the inbound email’s subject line.  Once this condition is met, then our Flow component will be responsible for calling the “SetWhoSoldTheBusiness” endpoint in the Azure-hosted WebAPI, and the WebAPI will enqueue this email subject line.


MICROSOFT AZURE .NET MVC WebAPI (THE CLOUD)

Now let’s focus our attention on creating a couple of new WebAPI endpoints using Visual Studio 2015.  First, let’s create a SetWhoSoldTheBusiness endpoint that accepts a string parameter, which will contain the email subject line that gets passed to us by the Flow component.   Next, we’ll create a GetWhoSoldTheBusiness endpoint, which will be called by the Pi to retrieve email subject lines, as shown in the C# code below.


namespace BlueBird.Controllers
{
    /// 
    /// The email controller
    /// 
    public class EmailController : ApiController
    {
        /// 
        /// Set the region that sold the business
        /// 
        /// The subject line of the email
        // GET: api/SetWhoSoldTheBusiness?subjectLine=""
        [HttpGet]
        public void SetWhoSoldTheBusiness(string subjectLine)
        {
            try
            {
                Email.SetWhoSoldTheBusiness(subjectLine);
            }
            catch (Exception)
            {
                throw;
            }
        }

        /// 
        /// Get the region that sold the business
        /// 
        /// 
        // GET: api/GetWhoSoldTheBusiness
        [HttpGet]
        public string GetWhoSoldTheBusiness()
        {
            try
            {
                return Email.GetWhoSoldTheBusiness();
            }
            catch (Exception)
            {
                throw;
            }
        }
    }
}


Whereas our WebAPI endpoint code above acts as a façade layer for calls being made from external callers, the concrete class below is tasked with actually accomplishing the real work, like storing and retrieving the email subject lines.  It’s the job of the BlueBird.Repository.Email class to enqueue and dequeue email subject lines whenever it’s called on to do so by the SetWhoSoldTheBusiness and GetWhoSoldTheBusiness WebAPI endpoints in the abovementioned code.


namespace BlueBird.Repository
{
    /// 
    /// The email repository
    /// 
    public static class Email //: IEmail
    {
        /// 
        /// The company that sold the business
        /// 
        public static Queue whoSoldTheBusiness = new Queue();

        /// 
        /// Determine who sold the business via the email subject line and drop it in the queue
        /// 
        /// The email subject line
        public static void SetWhoSoldTheBusiness(string subjectLine)
        {
            try
            {
                if (subjectLine.Contains("KC"))
                {
                    whoSoldTheBusiness.Enqueue("KC");
                }
                else if (subjectLine.Contains("CHI"))
                {
                    whoSoldTheBusiness.Enqueue("CHI");
                }
                else if (subjectLine.Contains("TAL"))
                {
                    whoSoldTheBusiness.Enqueue("TAL");
                }
            }
            catch (Exception)
            {

                throw;
            }
        }

        /// 
        /// Return the region that sold the business and drop it from the queue
        /// 
        /// The email subject line
        public static string GetWhoSoldTheBusiness()
        {
            string retVal = string.Empty;

            try
            {
                if (whoSoldTheBusiness != null)
                {
                    if (whoSoldTheBusiness.Count > 0)
                    {
                        retVal = whoSoldTheBusiness.Dequeue();
                    }
                }

                return retVal;
            }
            catch (Exception)
            {
                throw;
            }
        }
    }
}


Well, this represents all the work we’ll need to do in the WebAPI project, aside from deploying it to the Azure Cloud.


UNIVERSAL WINDOWS APPLICATION (e.g. UWA)

So, now let’s create a blank Universal Windows Application (herein referred to simply as UWA) in Visual Studio 2015, which will act as a second caller to the WebAPI endpoints we created above.  As a quick recap, our Microsoft Flow component calls a method in our cloud-hosted WebAPI to enqueue email subject lines anytime its conditions are met. 

Thus, it’s only fitting that our UWA, which will be hosted on the Pi, will have the ability to retrieve the data that’s enqueued in our WebAPI so that it can do something creative with that data.  As a result, it will be the responsibility of the UWA living in the Pi to ping our Azure WebAPI GetWhoSoldTheBusiness method every 10 seconds to find out if any enqueued email subject lines exist.  If so, then it will retrieve them. 

What’s more, upon retrieving an email subject line, it will interrogate it for the word “KC” (for Kansas City) or “CHI” (for Chicago) somewhere in the email subject line.  If it finds the word “KC” then we’ll have it play one song on the Pi, and if it finds “CHI” then we’ll play a different song.  So, let’s let’s start creating our UWA IoT application. We’ll use the Visual Studio 2015 (Universal Windows) template to get started.  Let’s name the new project PSCBlueBirdIoT, just like what’s shown in the screen below:

IoTWizard9.png

After creating the UWA Project, we’ll want to right-click on the project and enter in our Pi’s local IP Address.  We’ll also want to target it as a Remote Machine.  Also, let’s make sure that we check the “Uninstall and then re-install my package” option so that we’re not creating new instances of our application every time you redeploy to the Pi.  One last item of detail, let’s make sure that we check the “Allow local network loopback” option under the “Start Action” grouping as shown below.

IoTWizard10.png

Our code’s going to be really simple for the UWA Project.  Let’s create a simple timer inside of it that fires every ten seconds.  Whenever the timer fires, its sole responsibility will be to make an AJAX call to our Azure-hosted (cloud hosted) Web API endpoint, GetWhoSoldTheBusiness. And, it will pull back that value from the WebAPI queue object if an entry exists.  As previously mentioned, if the email subject line contains “KC” (e.g. “PSC Win Wire- KC”), then we’ll play one song; otherwise, we’ll play a different song if the email subject line contains “CHI” (e.g. “PSC Win Wire – CHI”).  Here’s the code for this:


namespace PSCBlueBirdIoT
{
    /// 
    /// An empty page that can be used on its own or navigated to within a Frame.
    /// 
    public sealed partial class MainPage : Page
    {
        #region Private Member Variables

        /// 
        /// Local timer
        /// 
        DispatcherTimer _timer = new DispatcherTimer();
        Queue _queueDealsWon = new Queue();

        #endregion

        #region Events

        /// 
        /// The main page
        /// 
        public MainPage()
        {
            this.InitializeComponent();
            this.DispatchTimerSetup();

        }

        /// 
        /// Fires on timer tick
        /// 
        /// The timer
        /// Any additional event arguments
        private void _timer_Tick(object sender, object e)
        {
            this.GetWhoSoldTheBusiness();
        }

        #endregion

        #region Private Methods

        /// 
        /// The setup for the dispatch timer
        /// 
        private void DispatchTimerSetup()
        {
            _timer.Tick += _timer_Tick;
            _timer.Interval = new TimeSpan(0, 1, 0);
            _timer.Start();
        }

        /// 
        /// Get who sold the business
        /// 
        private async void GetWhoSoldTheBusiness()
        {
            try
            {
                using (var client = new HttpClient())
                {
                    string retVal = string.Empty;

                    retVal = await client.GetStringAsync(new Uri("https://yourazurewebsite.net/api/Email/GetWhoSoldTheBusiness"));
                    retVal = retVal.Replace("\\", "");

                    if (retVal != string.Empty && retVal != "\"\"" && retVal != null)
                    {
                        if (retVal.Contains("CHI"))
                        {
                            retVal = "CHI.mp3";
                        }
                        else if (retVal.Contains("KC"))
                        {
                            retVal = "KC.mp3";
                        }
                        _queueDealsWon.Enqueue(retVal);

                        StorageFile file = await StorageFile.GetFileFromApplicationUriAsync(new Uri("ms-appx:///Music/" + _queueDealsWon.Dequeue()));
                        BackgroundMediaPlayer.Shutdown();
                        MediaPlayer player = BackgroundMediaPlayer.Current;
                        player.AutoPlay = false;
                        player.SetFileSource(file);
                        player.Play();

                    }
                }
            }
            catch (Exception e)
            {
                throw e;
            }
        }

        #endregion
    }
}


Now that this is done, let’s build and deploy our UWA application onto the Pi.  The pictorial below shows it doing its magic.  Because we’ve set the Pi up as a Trusted Remote Host, above, we can also do things like debug it using Visual Studio 2015 (Administrator mode) on our local machine.

IoTWizard11.png


TESTING IT ALL OUT

At this point, we’re done…as in “done, done”.  Smile  So, let’s test it end-to-end by kicking off an email to ourselves that matches the criteria we entered in our Microsoft Flow component.  If all goes as planned, then our Flow component will pick it up, call our Azure-based WebAPI endpoint and then enqueue our email subject line.

Finally, our UWA, which lives on the Pi, will separately call the other Azure-based WebAPI endpoint every 10 seconds, dequeueing and returning any email subject lines that might exist inside our Azure-hosted WebAPI.  Once the UWA application retrieves an email subject line, it will then determine if either “CHI” or “KC” is present within the subject line and play one song or another based on the response.  Pretty cool, huh?!?  Anyway, here’s a quick video of it in action…

Thanks for reading and keep on coding! 🙂

MicrosoftFlow

Author: Cole Francis, Architect

Today I had the pleasure of working with Microsoft Flow, Microsoft’s latest SaaS-based workflow offering. Introduced in April, 2016 and still in Preview mode, Flow allows both developers and non-developers alike to rapidly create visual workflow sequences using a number of on-prem and cloud-based services.  In fact, anyone who is interested in “low code” or “no code” integration-centric  solutions might want to take a closer look at Microsoft Flow.

Given this, I thought my goal for today would be to leverage Microsoft Flow to create a very rudimentary workflow that gets kicked off by an ordinary email, which in turn will call a cloud-based MVC WebAPI endpoint via an HTTP GET request, and then it will ultimately crank out a second email initiated by the WebAPI endpoint.

Obviously, the custom WebAPI endpoint isn’t necessary to generate the second email, as Microsoft Flow can accomplish this on its own without requiring any custom code at all.  So, the reason I’m adding the custom WebAPI enpoint into the mix is to simply prove that Flow has the ability to integrate with a custom RESTful WebAPI endpoint.  After all, if I can successfully accomplish this, then I can foreseeably communicate with any endpoint on any codebase on any platform.  So, here’s my overall architectural design and workflow:

Microsoft Flow

To kick things off, let’s create a simple workflow using Microsoft Flow.  We’ll do this by first logging into Microsoft Office 365.  If we look closely, we’ll find the Flow application within the waffle:

Office365Portal

After clicking on the Flow application, I’m taken to the next screen where I can either choose from an impressive number of existing workflow templates, or I can optionally choose to create my own custom workflow:

FlowTemplates.png

I need to call out that I’ve just shown you a very small fraction of pre-defined templates that are actually available in Flow.  As of this writing, there are hundreds of pre-defined templates that can be used to integrate with an impressive number of Microsoft and non-Microsoft platforms.  The real beauty is that they can be used to perform some very impressive tasks without writing a lick of code.  For example, I can incorporate approval workflows, collect data, interact with various email platforms, perform mobile push notifications (incl. iOS), track productivity, interact with various social media channels, synchronize data, etc…

Moreover, Microsoft Flow comes with an impressive number of triggers, which interact with an generous number of platforms, such as Box, DropBox, Dynamics CRM, Facebook, GitHub, Google Calendar, Instagram, MailChimp, Office365, OneDrive, OneDrive for Business, Project Online, RSS, Salesforce, SharePoint, SparkPost, Trello, Twitter, Visual Studio Team Services, Wunderlist, Yammer, YouTube, PowerApps, and more.

So, let’s continue building our very own Microsoft Flow workflow object.  I’ll do this by clicking on the “My Flows” option at the top of the web page.  This navigates me to a page that displays my saved workflows.  In my case, I don’t currently have any saved workflows, so I’ll click the “Create new flow” button that’s available to me (see the image below).

MyFlows

Next, I’ll search for the word “Mail”, which presents me with the following options:

Office365Email.png

Since the company I work for uses Microsoft Office 365 Outlook, I’ll select that option.  After doing this, I’m presented with the following “Action widget”.

Office365Inbox.png

I will then click on the “Show advanced options” link, which provides me with some additional options.  I’ll fill in the information using something that meets my specific needs.  In my particular case, I want to be able to kick-off my workflow from any email that contains “Win” in the Subject line.

Office365InboxOptions

Next, I’ll click on the (+ New step) link at the bottom of my widget, and I’m presented with some additional options.  As you can see, I can either “Add another action”, “Add a condition”, or click on the “…More” option to do things like “Add an apply to each” option, “Add a do until” condition, or “Add a scope”.

Office365InboxOptions0.png

As I previously mentioned, I want to be able to call a custom Azure-based RESTful WebAPI endpoint from my custom Flow object.  So, I’ll click on the “Add an action”, and then I’ll select the “HTTP” widget from the list of actions that are available.

RESTfulWebAPIoption.png

After clicking on the “HTTP” widget, I’m now presented with the “HTTP” widget options.  At a minimum, the “HTTP” object will allow me to specify a URI for my WebAPI endpoint (e.g. http://www.microsoftazure.net/XXXEndpoint), as well as an Http Verb (e.g. GET, POST, DELETE, etc…).  You’ll need to fill in your RESTful WebAPI endpoint data according to your own needs, but mine looks like this:

HTTPOption.png

After I’m done, I’ll can save my custom Flow by clicking the “Create Flow” button at the top of the page and providing my Flow with a meaningful name.  Providing your Flow with a meaningful name is very important, because you could eventually have a hundred of these things, so being able to distinguish one from another will be key.  For example, I named my custom Flow “PSC Win Wire”.  After saving my Flow, I can now do things like create additional Flows, edit existing Flows, activate or deactivate Flows, delete Flows, and review the viability and performance of my existing Flows by clicking on the “List Runs” icon that’s available to me.

SaveFlow.png

In any event, now that I’ve completed my custom Flow object, all I’ll need to do now is quickly spin up a .NET MVC WebAPI2 solution that contains my custom WebAPI endpoint, and then push my bits to the Cloud in order to publicly expose my endpoint.  I need to point out that my solution doesn’t necessarily need to be hosted in the Cloud, as a publicly exposed on-prem endpoint should work just fine.  However, I don’t have a quick way of publicly exposing my WebAPI endpoint on-prem, so resorting to the Cloud is the best approach for me.

I also need to point out again that creating a custom .NET MVC WebAPI isn’t necessary to run Microsoft Flows.  There are plenty of OOB templates that don’t require you to write any custom code at all.  This type of versatility is what makes Microsoft Flow so alluring.

In any case, the end result of my .NET MVC WebAPI2 project is shown below.  As you can see, the core WebAPI code generates an email (my real code will have values where you only see XXXX’s in the pic below…sorry!   🙂

MVCWebAPI.png

The GetLatestEmail() method will get called from a publicly exposed endpoint in the EmailController() class.  For simplicity’s sake, my EmailController class only contains one endpoint, and its named GetLatestEmails():

The Controller.png

So, now that I’m done setting everything up, it’s time for me to publish my code to the Azure Cloud.  I’ll start this off by cleaning and building my solution.  Afterwards, I’ll right-click on my project in the Solution Explorer pane, and then I’ll click on the Publish option that appears below.

Publish1.png

Now that this is out of the way, I’ll begin entering in my Azure Publish Web profile options.  Since I’m deploying an MVC application that contains a WebAPI2 endpoint, I’ve selected the “Microsoft Azure Web Apps” option form the Profile category.

Publish2.png

Next, I’ll enter the “Connection” options and fill that information in.   Afterwards, I should now have enough information to publish my solution to the Azure Cloud.  Of course, if you’re trying this on your own, this example assumes that you already have a Microsoft Azure Account.  If you don’t have a Microsoft Azure account, then you can find out more about it by clicking here.

Publish3.png

Regardless, I’ll click the “Publish” button now, which will automatically compile my code. If the build is successful then it will publish my bits to Microsoft’s Azure Cloud.  Now comes the fun part…testing it out!

First, I’ll create an email that matches the same conditions that were specified by me in the “Office 365 Outlook – When an email arrives” Flow widget I previously created.  If you recall, that workflow widget is being triggered by the word “Win” in the Subject line of any email that gets sent to me, so I’ll make sure that my test email meets that condition.

PSCWinWireEmail

After I send an email that meets my Flow’s conditions, then my custom Flow object should get kicked-off and call my endpoint, which means that if all goes well, then I should receive another email from my WebAPI endpoint.  Hey, look!  I successfully received an email from the WebAPI endpoint, just as I expected.  That was really quick!  🙂

EmailResults.png

Now that we know that our custom Flow object works A-Z, I want tell you about another really cool Microsoft Flow feature, and that’s the ability to monitor the progress of my custom Flow objects.  I can accomplish this by clicking on the “List Runs” icon in the “My Flows” section of the Microsoft Flow main page (see below).

ListRun1.png

Doing this will conjure up the following page.  From here, I can gain more insight and visibility into the viability and efficiency of my custom Flows by simply clicking on the arrow to the right of each of the rows below.

ListRun2.png

Once I do that, I’m presented with the following page.  At this point, I can drill down into the objects by clicking on them, which will display all of the metadata associated with the selected widget.  Pretty cool, huh!

ListRun3.png

Well, that’s it for this example.  I hope you’ve enjoyed my walkthrough.  I personally find Microsoft Flow to be a very promising SaaS-based workflow offering.

Thanks for reading and keep on coding! 🙂

AngularJS.png

Author: Cole Francis, Architect

BACKGROUND

While you may not be able to tell it by my verbose articles, I am a devout source code minimalist by nature.  Although I’m not entirely certain how I ended up like this, I do have a few loose theories.

  1. I’m probably lazy.  I state this because I’m constantly looking for ways to do more work in fewer lines of code.  This is probably why I’m so partial to software design patterns.  I feel like once I know them, then being able to recapitulate them on command allows me to manufacturer software at a much quicker pace.  If you’ve spent anytime at all playing in the software integration space, then you can appreciate how imperative it is to be quick and nimble.
  2. I’m kind of old.  I cut my teeth in a period when machine resources weren’t exactly plentiful, so it was extremely important that your code didn’t consume too much memory, throttle down the CPU (singular), or take up an extraordinary amount of space on the hard drive or network share.  If it did, people had no problem crawling out of the woodwork to scold you.
  3. I have a guilty conscience.  As much as I would like to code with reckless abandon, I simply cannot bring myself to do it.  I’m sure I would lose sleep at night if I did.  In my opinion, concerns need to be separated, coding conventions need to be followed, yada, yada, yada…  However, there are situations that sometime cause me to overlook certain coding standards in favor of a lazier approach, and that’s when simplicity trumps rigidity!

So, without further delay, here’s a perfect example of my laziness persevering.  Let’s say that an AngularJS code base exists that properly separates its concerns by implementing a number of client-side controllers that perform their own genric activities. At this point, you’re now ready to lay down the client-side service layer functions to communicate with a number of remote Web-based REST API endpoints.  So, you start to write a bunch of service functions that implement the AngularJS http directive and its implied promise pattern, and then suddenly you have an epiphany!  Why not write one generic AngularJS service function that is capable of calling most RESTful Web API endpoints?  So, you think about it for a second, and then you lay down this little eclectic dynamo instead:


var contenttype = 'application/json';
var datatype = 'json';

/* A generic async service can call a RESTful Web API inside an implied $http promise.
*/
this.serviceAction = function(httpVerb, baseUrl, endpoint, qs) {
  return $http({
    method: httpVerb,
    url: baseUrl + endpoint + qs,
    contentType: contenttype,
    dataType: datatype,
  }).success(function(data){
    return data;
  }).error(function(){
    return null;
  });
};

 
That’s literally all there is to it! So, to wrap things up on the AngularJS client-side controller, you would call the service by implementing a fleshed out version of the code snippet below. Provided you aren’t passing in lists of data, and as long as the content types and data types follow the same pattern, then you should be able to write an endless number of AngularJS controller functions that can all call into the same service function, much like the one I’ve provided above. See, I told you I’m lazy. 🙂


/* Async call the AngularJS Service (shown above)
*/
$scope.doStuff = function (passedInId) {

  // Make a call to the AngularJS layer to call a remote endpoint
  httpservice.serviceAction('GET', $scope.baseURL(), '/some/endpoint', '?id=' + passedInId).then(function (response) {
    if (response != null && response.data.length > 0) {
      // Apply the response data to two-way bound array here!
    }
  });
};

 
Thanks for reading and keep on coding! 🙂