Author: Cole Francis, Architect
BACKGROUND
This weekend I picked up a Raspberry Pi 3 Model B, which is the last single-board computer from the Raspberry Pi Foundation. The Model B’s capabilities are quite impressive. For instance, it’s capable of streaming BluRay-quality video, and its 40-pin GPIO header gives you access to 27 GPIO, UART, I2C, SPI as well as both 3.3V and 5V power sources. It also comes with onboard Wi-Fi and Bluetooth, all in a compact unit that’s only slightly larger than a debit card.
What’s more, I also purchased a 7″ touch display that plugs right in to the Raspberry Pi’s motherboard. I was feeling creative, so I decided to find a way to take the technical foundation that I came up with in my previous article and somehow incorporate the Pi into that design, essentially taking it to a whole new level. If you read my previous article, then you already know that my original design looks like this:
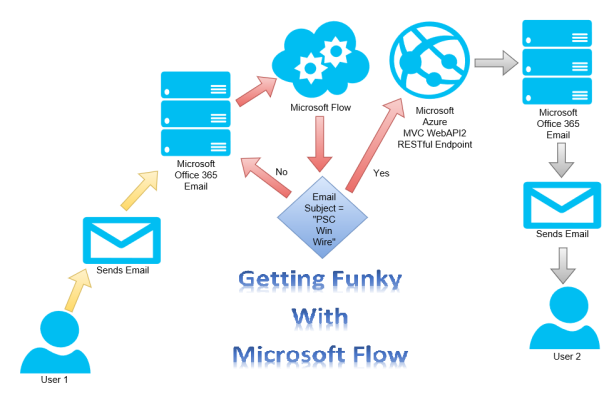
Basically, the abovementioned design workflow represents a Microsoft Office 365 Flow component monitoring my Microsoft Office 365 Exchange Inbox for incoming emails. It looks for anything with “Win” in the email subject line and automatically calls an Azure-based MVC WebAPI endpoint whenever it encounters one. In turn, the WebAPI endpoint then calls an internal method that sends out another email to User 2.
In any event, I created the abovementioned workflow to simply prove that we can do practically anything we want with Microsoft Flow acting as a catalyst to perform work across disparate platforms and codebases.
However, now I’m going to alter the original design workflow just a bit. First, I’m going to change the Microsoft Flow component to start passing in email subject lines into our Azure-based WebAPI endpoint. Secondly, I’m eliminating User 2 and substituting this person with the Raspberry Pi 3 IoT device running on a Windows 10 IoT Core OS. Never fear, in this article I’m also going to provide you with step-by-step instructions on how to install the OS on a Raspberry Pi 3 device. Also, from this point on I’m going to refer to the Raspberry Pi 3 as “the Pi” just because it’s easier.
Once again, if you read my previous article, then you already know that the only time the Microsoft Flow component contacts the WebAPI is if an inbound email’s subject line matches the criteria we setup for it in Microsoft Flow. In our new design, our Flow component will now pass the email subject line to a WebAPI enpoint, which will get enqueued in a static property in the cloud.
Separately, the Pi will also contact the Azure-hosted WebAPI endpoint on a regularly scheduled interval to see if an enqueued subject is being stored. If so, then the Pi’s call to the WebAPI will cause the WebAPI to dequeue the subject line and return it to the Pi. Finally, the Pi will interrogate the returned subject line and perform an automated action using the returned data. The following technical design workflow probably lays it out better than I can explain it.

SOLUTION
Our solution will take us through a number of steps, including:
-
Installing Microsoft Windows 10 IoT Core on the Pi.
-
Modifying the Microsoft Flow component that we created in the previous article.
-
Modifying the Azure-based (cloud) WebAPI2 project that I created in my previous article on Microsoft Flow.
-
Creating a new Universal Windows Application that will reside on the Pi.
So, let’s get started by first setting up the Pi and installing Microsoft 10 IoT Core on it. We’re going to build our own little Smart Factory.
SETTING UP THE RASPBERRY PI 3
First, we’ll need to download the tools that are necessary to get the Windows IoT Core on the Pi. You can get them here:
https://developer.microsoft.com/en-us/windows/iot/Downloads.htm
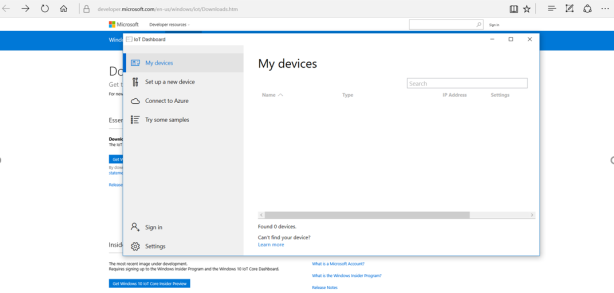
After we download the abovementioned tools, we’ll install them on our laptop or desktop. Then we’ll be presented with the following wizard that will help guide us through the rest of the process. The first screen that shows up is the “My devices” screen. As you can see, it’s blank, and I can honestly say that I’ve never seen anything filled in this portion of the wizard, so you can ignore this section for now. At this point, let’s sign into our Microsoft MSDN account and begin navigating through the wizard.
We can move onto the “Setup a new device” at this point:

Once we’re done adding our options, click the download and Install button in the lower right-hand corner of the screen. It prompts us to enter an SD card if we haven’t already.
***A small word of caution*** The Raspberry Pi 3 uses a MicroSD card to host its operating system on, so take that into consideration when shopping for SD Cards. What you’ll probably want to get is a MicroSD with a regular SD card adapter. That’s what I did. You’ll also want to study the SD Cards that Microsoft recommends for compatibility. I unsuccessfully burnt through three SD cards before I gave up and went with their recommendation. After conceding and going with a compatible SD card, I was able to render the Windows 10 IoT Core OS successfully, so don’t make the same costly mistake I made.
Anyway, we’ll eventually get to the point where we’re asked to erase the data on the SD card we’ve inserted. This process deletes all existing data on our SD card, formats it using a FAT32 file system, and then installs the Windows 10 IoT Core image on it.

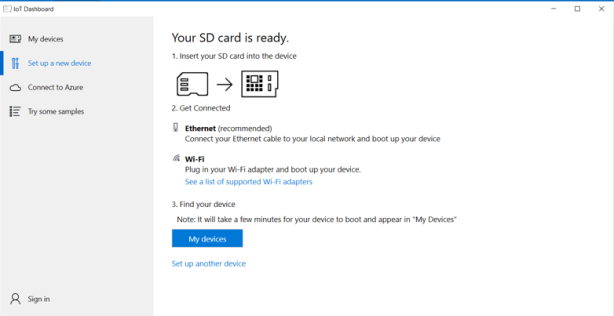
You should see the following screen when the wizard starts copying the files onto the SD card:

Our SD card is finally ready for action.
At this point, we can remove the SD Card Adapter from our laptop or desktop, and also remove the micro SD card from the SD Card Adapter. Next, insert the micro SD card into the Pi’s miniSD port and then boot it up.
Afterwards, we’ll connect an Ethernet cable from our laptop (or optionally a desktop) to the Ethernet port on the Raspberry Pi. Then we’ll run the following command using the Pi’s local IP address. For example, my Pi’s IP address is 169.254.16.5, but your Pi’s IP address might be different, so pay close attention to this detail.
Anyway, this sets the Pi up as a Remote Managed Trusted Host and allows us to administer it from our local machine, which in this case is a laptop. So, now we should be able to deploy our code to the Pi and interact with in Visual Studio 2015 debug mode.

At this point, all of the heavy lifting for the Pi’s OS installation and communication infrastructure is complete.
MODIFYING OUR EXISTING MICROSOFT FLOW COMPONENT
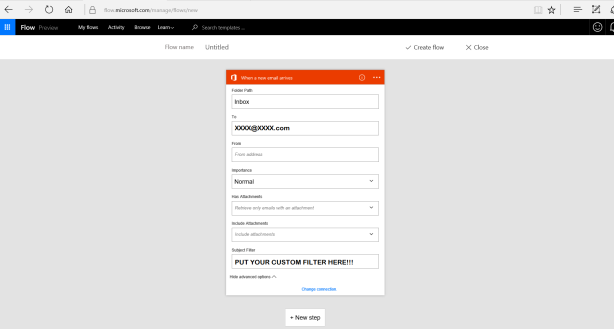
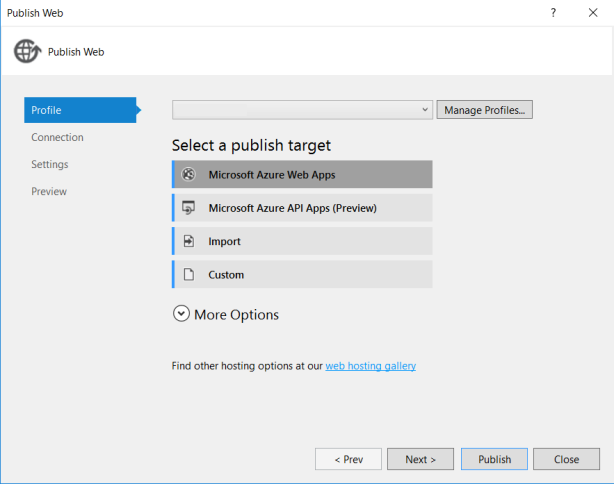
So, let’s piggyback off of the previous article I wrote about on Microsoft Flow and extend it to incorporate a Pi into the mix. But, before we do, let’s tweak our Microsoft “PSC Win Wire” Flow component just a bit, since our new design goal is to start passing in the subject line of an inbound email to an Azure-hosted WebAPI endpoint. If you recall, in the previous article we were simply calling a WebAPI endpoint without passing a parameter. So, let’s change the “PSC Win Wire” Flow component so that we can start passing an email subject line to a WebAPI endpoint. We’ll accomplish this by making the changes you see in the picture below.

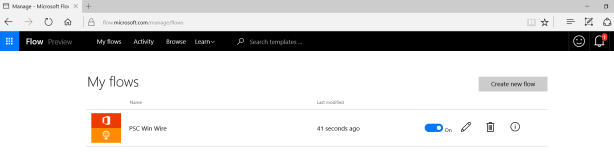
We’re now officially done with the necessary modifications to our Microsoft Flow component, so let’s save our work.
Once again, it’s the Flow component’s job is to continually monitor our email inbox for any emails that match the conditions that we set up, which in this case are if “PSC Win Wire” is included in the inbound email’s subject line. Once this condition is met, then our Flow component will be responsible for calling the “SetWhoSoldTheBusiness” endpoint in the Azure-hosted WebAPI, and the WebAPI will enqueue this email subject line.
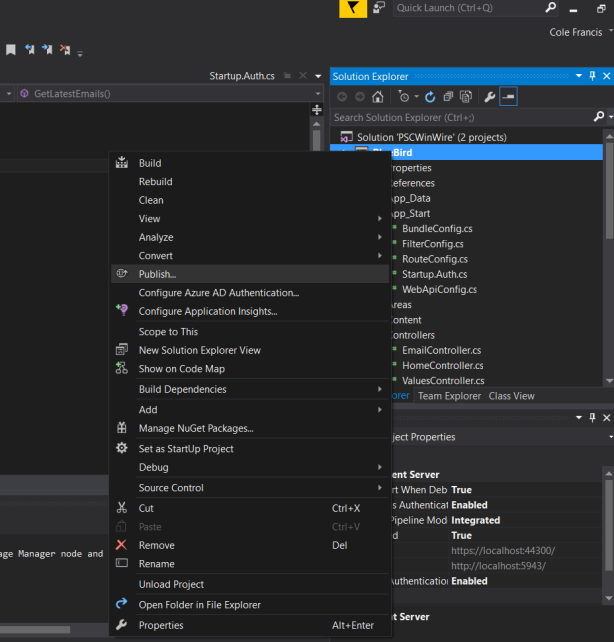
MICROSOFT AZURE .NET MVC WebAPI (THE CLOUD)
Now let’s focus our attention on creating a couple of new WebAPI endpoints using Visual Studio 2015. First, let’s create a SetWhoSoldTheBusiness endpoint that accepts a string parameter, which will contain the email subject line that gets passed to us by the Flow component. Next, we’ll create a GetWhoSoldTheBusiness endpoint, which will be called by the Pi to retrieve email subject lines, as shown in the C# code below.
namespace BlueBird.Controllers
{
    ///
    /// The email controller
    ///
    public class EmailController : ApiController
    {
        ///
        /// Set the region that sold the business
        ///
        /// The subject line of the email
        // GET: api/SetWhoSoldTheBusiness?subjectLine=""
        [HttpGet]
        public void SetWhoSoldTheBusiness(string subjectLine)
        {
            try
            {
                Email.SetWhoSoldTheBusiness(subjectLine);
            }
            catch (Exception)
            {
                throw;
            }
        }

        ///
        /// Get the region that sold the business
        ///
        ///
        // GET: api/GetWhoSoldTheBusiness
        [HttpGet]
        public string GetWhoSoldTheBusiness()
        {
            try
            {
                return Email.GetWhoSoldTheBusiness();
            }
            catch (Exception)
            {
                throw;
            }
        }
    }
}
Whereas our WebAPI endpoint code above acts as a façade layer for calls being made from external callers, the concrete class below is tasked with actually accomplishing the real work, like storing and retrieving the email subject lines. It’s the job of the BlueBird.Repository.Email class to enqueue and dequeue email subject lines whenever it’s called on to do so by the SetWhoSoldTheBusiness and GetWhoSoldTheBusiness WebAPI endpoints in the abovementioned code.
namespace BlueBird.Repository
{
    ///
    /// The email repository
    ///
    public static class Email //: IEmail
    {
        ///
        /// The company that sold the business
        ///
        public static Queue whoSoldTheBusiness = new Queue();

        ///
        /// Determine who sold the business via the email subject line and drop it in the queue
        ///
        /// The email subject line
        public static void SetWhoSoldTheBusiness(string subjectLine)
        {
            try
            {
                if (subjectLine.Contains("KC"))
                {
                    whoSoldTheBusiness.Enqueue("KC");
                }
                else if (subjectLine.Contains("CHI"))
                {
                    whoSoldTheBusiness.Enqueue("CHI");
                }
                else if (subjectLine.Contains("TAL"))
                {
                    whoSoldTheBusiness.Enqueue("TAL");
                }
            }
            catch (Exception)
            {

                throw;
            }
        }

        ///
        /// Return the region that sold the business and drop it from the queue
        ///
        /// The email subject line
        public static string GetWhoSoldTheBusiness()
        {
            string retVal = string.Empty;

            try
            {
                if (whoSoldTheBusiness != null)
                {
                    if (whoSoldTheBusiness.Count > 0)
                    {
                        retVal = whoSoldTheBusiness.Dequeue();
                    }
                }

                return retVal;
            }
            catch (Exception)
            {
                throw;
            }
        }
    }
}
Well, this represents all the work we’ll need to do in the WebAPI project, aside from deploying it to the Azure Cloud.
UNIVERSAL WINDOWS APPLICATION (e.g. UWA)
So, now let’s create a blank Universal Windows Application (herein referred to simply as UWA) in Visual Studio 2015, which will act as a second caller to the WebAPI endpoints we created above. As a quick recap, our Microsoft Flow component calls a method in our cloud-hosted WebAPI to enqueue email subject lines anytime its conditions are met.
Thus, it’s only fitting that our UWA, which will be hosted on the Pi, will have the ability to retrieve the data that’s enqueued in our WebAPI so that it can do something creative with that data. As a result, it will be the responsibility of the UWA living in the Pi to ping our Azure WebAPI GetWhoSoldTheBusiness method every 10 seconds to find out if any enqueued email subject lines exist. If so, then it will retrieve them.
What’s more, upon retrieving an email subject line, it will interrogate it for the word “KC” (for Kansas City) or “CHI” (for Chicago) somewhere in the email subject line. If it finds the word “KC” then we’ll have it play one song on the Pi, and if it finds “CHI” then we’ll play a different song. So, let’s let’s start creating our UWA IoT application. We’ll use the Visual Studio 2015 (Universal Windows) template to get started. Let’s name the new project PSCBlueBirdIoT, just like what’s shown in the screen below:

After creating the UWA Project, we’ll want to right-click on the project and enter in our Pi’s local IP Address. We’ll also want to target it as a Remote Machine. Also, let’s make sure that we check the “Uninstall and then re-install my package” option so that we’re not creating new instances of our application every time you redeploy to the Pi. One last item of detail, let’s make sure that we check the “Allow local network loopback” option under the “Start Action” grouping as shown below.

Our code’s going to be really simple for the UWA Project. Let’s create a simple timer inside of it that fires every ten seconds. Whenever the timer fires, its sole responsibility will be to make an AJAX call to our Azure-hosted (cloud hosted) Web API endpoint, GetWhoSoldTheBusiness. And, it will pull back that value from the WebAPI queue object if an entry exists. As previously mentioned, if the email subject line contains “KC” (e.g. “PSC Win Wire- KC”), then we’ll play one song; otherwise, we’ll play a different song if the email subject line contains “CHI” (e.g. “PSC Win Wire – CHI”). Here’s the code for this:
namespace PSCBlueBirdIoT
{
    ///
    /// An empty page that can be used on its own or navigated to within a Frame.
    ///
    public sealed partial class MainPage : Page
    {
        #region Private Member Variables

        ///
        /// Local timer
        ///
        DispatcherTimer _timer = new DispatcherTimer();
        Queue _queueDealsWon = new Queue();

        #endregion

        #region Events

        ///
        /// The main page
        ///
        public MainPage()
        {
            this.InitializeComponent();
            this.DispatchTimerSetup();

        }

        ///
        /// Fires on timer tick
        ///
        /// The timer
        /// Any additional event arguments
        private void _timer_Tick(object sender, object e)
        {
            this.GetWhoSoldTheBusiness();
        }

        #endregion

        #region Private Methods

        ///
        /// The setup for the dispatch timer
        ///
        private void DispatchTimerSetup()
        {
            _timer.Tick += _timer_Tick;
            _timer.Interval = new TimeSpan(0, 1, 0);
            _timer.Start();
        }

        ///
        /// Get who sold the business
        ///
        private async void GetWhoSoldTheBusiness()
        {
            try
            {
                using (var client = new HttpClient())
                {
                    string retVal = string.Empty;

                    retVal = await client.GetStringAsync(new Uri("https://yourazurewebsite.net/api/Email/GetWhoSoldTheBusiness"));
                    retVal = retVal.Replace("\\", "");

                    if (retVal != string.Empty && retVal != "\"\"" && retVal != null)
                    {
                        if (retVal.Contains("CHI"))
                        {
                            retVal = "CHI.mp3";
                        }
                        else if (retVal.Contains("KC"))
                        {
                            retVal = "KC.mp3";
                        }
                        _queueDealsWon.Enqueue(retVal);

                        StorageFile file = await StorageFile.GetFileFromApplicationUriAsync(new Uri("ms-appx:///Music/" + _queueDealsWon.Dequeue()));
                        BackgroundMediaPlayer.Shutdown();
                        MediaPlayer player = BackgroundMediaPlayer.Current;
                        player.AutoPlay = false;
                        player.SetFileSource(file);
                        player.Play();

                    }
                }
            }
            catch (Exception e)
            {
                throw e;
            }
        }

        #endregion
    }
}
Now that this is done, let’s build and deploy our UWA application onto the Pi. The pictorial below shows it doing its magic. Because we’ve set the Pi up as a Trusted Remote Host, above, we can also do things like debug it using Visual Studio 2015 (Administrator mode) on our local machine.

TESTING IT ALL OUT
At this point, we’re done…as in “done, done”. ![]() So, let’s test it end-to-end by kicking off an email to ourselves that matches the criteria we entered in our Microsoft Flow component. If all goes as planned, then our Flow component will pick it up, call our Azure-based WebAPI endpoint and then enqueue our email subject line.
So, let’s test it end-to-end by kicking off an email to ourselves that matches the criteria we entered in our Microsoft Flow component. If all goes as planned, then our Flow component will pick it up, call our Azure-based WebAPI endpoint and then enqueue our email subject line.
Finally, our UWA, which lives on the Pi, will separately call the other Azure-based WebAPI endpoint every 10 seconds, dequeueing and returning any email subject lines that might exist inside our Azure-hosted WebAPI. Once the UWA application retrieves an email subject line, it will then determine if either “CHI” or “KC” is present within the subject line and play one song or another based on the response. Pretty cool, huh?!? Anyway, here’s a quick video of it in action…
Thanks for reading and keep on coding! 🙂