


Author: Cole Francis, Architect
Today I had the pleasure of working with Microsoft Flow, Microsoft’s latest SaaS-based workflow offering. Introduced in April, 2016 and still in Preview mode, Flow allows both developers and non-developers alike to rapidly create visual workflow sequences using a number of on-prem and cloud-based services. In fact, anyone who is interested in “low code” or “no code” integration-centric solutions might want to take a closer look at Microsoft Flow.
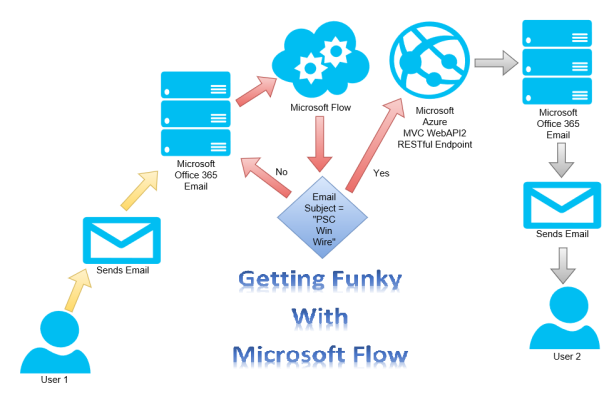
Given this, I thought my goal for today would be to leverage Microsoft Flow to create a very rudimentary workflow that gets kicked off by an ordinary email, which in turn will call a cloud-based MVC WebAPI endpoint via an HTTP GET request, and then it will ultimately crank out a second email initiated by the WebAPI endpoint.
Obviously, the custom WebAPI endpoint isn’t necessary to generate the second email, as Microsoft Flow can accomplish this on its own without requiring any custom code at all. So, the reason I’m adding the custom WebAPI enpoint into the mix is to simply prove that Flow has the ability to integrate with a custom RESTful WebAPI endpoint. After all, if I can successfully accomplish this, then I can foreseeably communicate with any endpoint on any codebase on any platform. So, here’s my overall architectural design and workflow:
To kick things off, let’s create a simple workflow using Microsoft Flow. We’ll do this by first logging into Microsoft Office 365. If we look closely, we’ll find the Flow application within the waffle:

After clicking on the Flow application, I’m taken to the next screen where I can either choose from an impressive number of existing workflow templates, or I can optionally choose to create my own custom workflow:
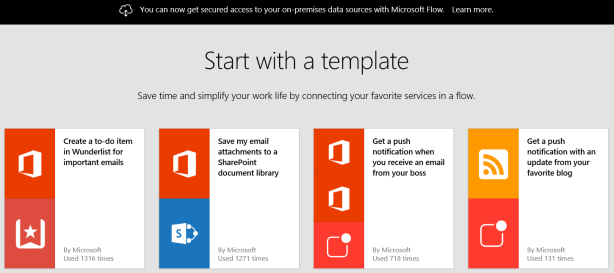
I need to call out that I’ve just shown you a very small fraction of pre-defined templates that are actually available in Flow. As of this writing, there are hundreds of pre-defined templates that can be used to integrate with an impressive number of Microsoft and non-Microsoft platforms. The real beauty is that they can be used to perform some very impressive tasks without writing a lick of code. For example, I can incorporate approval workflows, collect data, interact with various email platforms, perform mobile push notifications (incl. iOS), track productivity, interact with various social media channels, synchronize data, etc…
Moreover, Microsoft Flow comes with an impressive number of triggers, which interact with an generous number of platforms, such as Box, DropBox, Dynamics CRM, Facebook, GitHub, Google Calendar, Instagram, MailChimp, Office365, OneDrive, OneDrive for Business, Project Online, RSS, Salesforce, SharePoint, SparkPost, Trello, Twitter, Visual Studio Team Services, Wunderlist, Yammer, YouTube, PowerApps, and more.
So, let’s continue building our very own Microsoft Flow workflow object. I’ll do this by clicking on the “My Flows” option at the top of the web page. This navigates me to a page that displays my saved workflows. In my case, I don’t currently have any saved workflows, so I’ll click the “Create new flow” button that’s available to me (see the image below).

Next, I’ll search for the word “Mail”, which presents me with the following options:

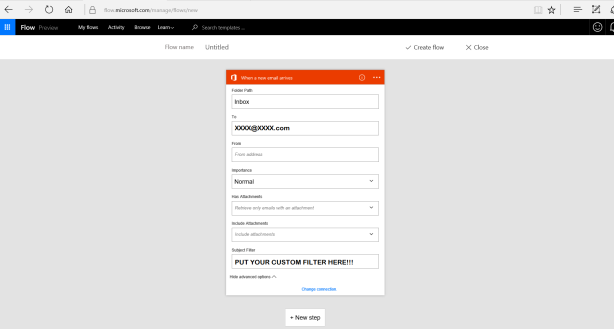
Since the company I work for uses Microsoft Office 365 Outlook, I’ll select that option. After doing this, I’m presented with the following “Action widget”.

I will then click on the “Show advanced options” link, which provides me with some additional options. I’ll fill in the information using something that meets my specific needs. In my particular case, I want to be able to kick-off my workflow from any email that contains “Win” in the Subject line.
Next, I’ll click on the (+ New step) link at the bottom of my widget, and I’m presented with some additional options. As you can see, I can either “Add another action”, “Add a condition”, or click on the “…More” option to do things like “Add an apply to each” option, “Add a do until” condition, or “Add a scope”.

As I previously mentioned, I want to be able to call a custom Azure-based RESTful WebAPI endpoint from my custom Flow object. So, I’ll click on the “Add an action”, and then I’ll select the “HTTP” widget from the list of actions that are available.

After clicking on the “HTTP” widget, I’m now presented with the “HTTP” widget options. At a minimum, the “HTTP” object will allow me to specify a URI for my WebAPI endpoint (e.g. http://www.microsoftazure.net/XXXEndpoint), as well as an Http Verb (e.g. GET, POST, DELETE, etc…). You’ll need to fill in your RESTful WebAPI endpoint data according to your own needs, but mine looks like this:

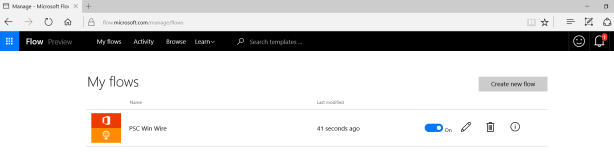
After I’m done, I’ll can save my custom Flow by clicking the “Create Flow” button at the top of the page and providing my Flow with a meaningful name. Providing your Flow with a meaningful name is very important, because you could eventually have a hundred of these things, so being able to distinguish one from another will be key. For example, I named my custom Flow “PSC Win Wire”. After saving my Flow, I can now do things like create additional Flows, edit existing Flows, activate or deactivate Flows, delete Flows, and review the viability and performance of my existing Flows by clicking on the “List Runs” icon that’s available to me.
In any event, now that I’ve completed my custom Flow object, all I’ll need to do now is quickly spin up a .NET MVC WebAPI2 solution that contains my custom WebAPI endpoint, and then push my bits to the Cloud in order to publicly expose my endpoint. I need to point out that my solution doesn’t necessarily need to be hosted in the Cloud, as a publicly exposed on-prem endpoint should work just fine. However, I don’t have a quick way of publicly exposing my WebAPI endpoint on-prem, so resorting to the Cloud is the best approach for me.
I also need to point out again that creating a custom .NET MVC WebAPI isn’t necessary to run Microsoft Flows. There are plenty of OOB templates that don’t require you to write any custom code at all. This type of versatility is what makes Microsoft Flow so alluring.
In any case, the end result of my .NET MVC WebAPI2 project is shown below. As you can see, the core WebAPI code generates an email (my real code will have values where you only see XXXX’s in the pic below…sorry! 🙂

The GetLatestEmail() method will get called from a publicly exposed endpoint in the EmailController() class. For simplicity’s sake, my EmailController class only contains one endpoint, and its named GetLatestEmails():

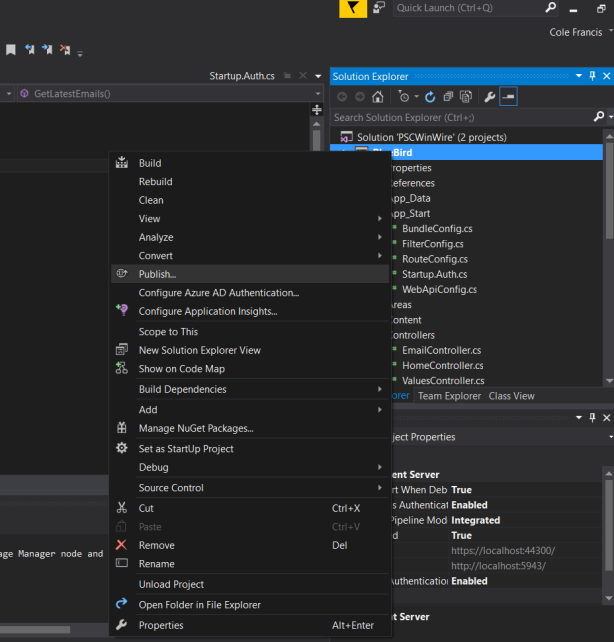
So, now that I’m done setting everything up, it’s time for me to publish my code to the Azure Cloud. I’ll start this off by cleaning and building my solution. Afterwards, I’ll right-click on my project in the Solution Explorer pane, and then I’ll click on the Publish option that appears below.
Now that this is out of the way, I’ll begin entering in my Azure Publish Web profile options. Since I’m deploying an MVC application that contains a WebAPI2 endpoint, I’ve selected the “Microsoft Azure Web Apps” option form the Profile category.
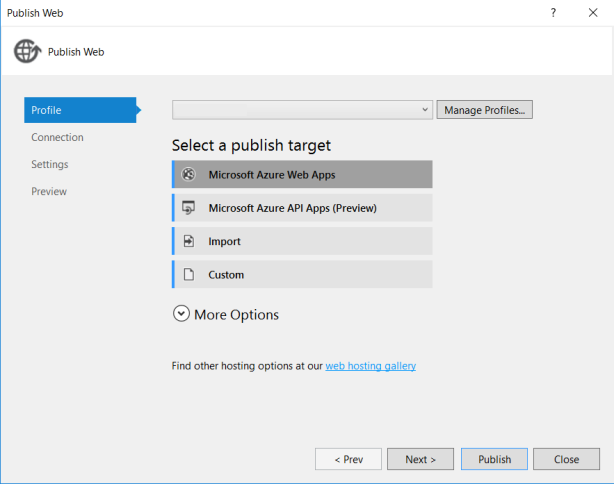
Next, I’ll enter the “Connection” options and fill that information in. Afterwards, I should now have enough information to publish my solution to the Azure Cloud. Of course, if you’re trying this on your own, this example assumes that you already have a Microsoft Azure Account. If you don’t have a Microsoft Azure account, then you can find out more about it by clicking here.

Regardless, I’ll click the “Publish” button now, which will automatically compile my code. If the build is successful then it will publish my bits to Microsoft’s Azure Cloud. Now comes the fun part…testing it out!
First, I’ll create an email that matches the same conditions that were specified by me in the “Office 365 Outlook – When an email arrives” Flow widget I previously created. If you recall, that workflow widget is being triggered by the word “Win” in the Subject line of any email that gets sent to me, so I’ll make sure that my test email meets that condition.

After I send an email that meets my Flow’s conditions, then my custom Flow object should get kicked-off and call my endpoint, which means that if all goes well, then I should receive another email from my WebAPI endpoint. Hey, look! I successfully received an email from the WebAPI endpoint, just as I expected. That was really quick! 🙂

Now that we know that our custom Flow object works A-Z, I want tell you about another really cool Microsoft Flow feature, and that’s the ability to monitor the progress of my custom Flow objects. I can accomplish this by clicking on the “List Runs” icon in the “My Flows” section of the Microsoft Flow main page (see below).

Doing this will conjure up the following page. From here, I can gain more insight and visibility into the viability and efficiency of my custom Flows by simply clicking on the arrow to the right of each of the rows below.

Once I do that, I’m presented with the following page. At this point, I can drill down into the objects by clicking on them, which will display all of the metadata associated with the selected widget. Pretty cool, huh!

Well, that’s it for this example. I hope you’ve enjoyed my walkthrough. I personally find Microsoft Flow to be a very promising SaaS-based workflow offering.
Thanks for reading and keep on coding! 🙂


Many thanks for your excellent report, your experience will be useful to me!
LikeLike
Nice article. Thanks. I’ve been tinkering with Flow recently as well.
https://digitalbbq.wordpress.com/2016/10/17/sentiment-analysis-with-microsoft-flow-azure-sql-database-power-bi-and-azure-cognitive-services/
LikeLike