


Click Here to Download My Dockerized .NET Core Solution
Author: Cole Francis, Architect
Preface
Before I get embark on my discussion on Docker Containers, it’s important that I tell you that my appreciation for Docker Containers stems from an interesting conversation I had with a very intelligent co-worker of mine at PSC, Norm Murrin. Norm is traditionally the guy in the office that you go to when you can’t figure something out on your own. The breadth and depth of his technical capabilities is absolutely amazing. Anyway, I want to thank him for the time he spent getting me up-to-speed on them, because frankly put, Containers are really quite amazing once you understand their purpose and value. Containerization is definitely a trend your going to see used a lot more in the DevOps community, and getting to understand them now will greatly benefit you as their use becomes much more mainstream in the future. You can navigate to Norm Murrin’s blog site by clicking here.
The Origins of OSVs
“Operating System Virtualization”, also known as OSV, was born predominantly out of a need for infrastructure teams to balance large numbers of users across a restrictive amount of physical hardware. Virtualizing an operating system entails creating isolated partitions representing a physical instance of a server, and then virtualizing it into multiple isolated partitions that replicate the original server.
Because the isolated partitions use normal operating system call interfaces, there’s no need for them to be emulated or executed by an intermediate virtual machine. Therefore, the end result is that running the OSV comes with almost no overhead. Other immediate benefits include:
- It streamlines your organization’s machine provisioning processes,
- It improves your organization’s applications availability and scalability,
- It helps your organization create bullet-proof disaster recovery plans,
- It helps reduce costly on-prem hardware vendor affinities.
What’s more, the very fact that your company is virtualizing its servers and moving away from bare metal hardware systems probably indicates that it’s not only trying to address some of the bullet-point items I’ve previously mentioned, but it’s also preparing for a future cloud migration.
The Difference Between a VM and an OSV
Virtual machines, or VMs, require that the guest system and host system each have their own operating system, libraries, and a full memory instance in order to run in complete isolation. In turn, communication from the guest and host systems occurs in an abstracted layer known as the hypervisor.
Granted, the term “hypervisor” sounds pretty darn cool, but it’s not entirely efficient. For instance, starting and stopping a VMs necessitates a full booting process and memory load, which significantly limits the number of software applications that can reside on the host system. In most cases, a VM supports only one application.

On the contrary, OSVs offer incredibly lightweight virtual environments that incorporate a technique called “namespace isolation”. In the development community, we commonly refer to namespace isolation as “Containers”, and it’s this container level-of-isolation that can allows hundreds of anonymous containers to live and run side-by-side with one another, in complete anonymity of one another, on a single underlying host system.

The Advantages of Using Containers
One interesting item to note is that because Containers share resources on the same host system they operate on, there is often cooperative governance in place that allows the host system to maximize the efficiency of shared CPU, memory, and common OS libraries as the demands of the Containers continually change.
Cooperative governance accomplishes this by making sure that each container is supplied with an appropriate amount of resources to operate efficiently, while at the same time not encroaching on the availability of resources required by the other running containers. It’s also important to point out that this dynamic allocation of resources can be manually overridden.
- Cooperative Governance – Doesn’t require any sort of finite resource limitations or other impositions by the host. Instead, the host dynamically orchestrates the reallocation of resources as the ongoing demand changes.
- Manual Governance – A Container can be limited so it cannot consume more than a certain percentage of the CPU or memory at any given time.
Other great advantages that Containers have over bare metal virtual machines are:
- You don’t have to install an operating system on the Container system.
- You also don’t have to get the latest patches for a Container system.
- You don’t have to install application frameworks or third-party dependency libraries.
- You don’t have to worry about networking issues.
- You don’t have to install your application on a Container system.
- You don’t have to configure your application so that it works properly in your Container.
All of the abovementioned concerns are handled for you by the sheer nature of the Container.
Are There Any Disadvantages
While the advantages are numerous, there are some disadvantages to be aware of, including:
- Containers are immutable
- Containers run in a single process
- If you’re using .NET Core as your foundation, you’ll only have access to a partial feature set…for now anyway.
- There are some security vulnerabilities that you’ll want to be aware of, like large attack surfaces, operating system fragmentation, and virtual machine bloat.
- Because this is such a new technical area, not all third-party vendors offer support for Core applications. For example, at this point in time Oracle doesn’t offer Core capabilities for Entity Framework (EF). See more about this by clicking here.
Are VMs Dead
The really short answer is, “No.” Because Containers (OSVs) have so many advantages over VMs, the natural assumption is that VMs are going away, but this simply isn’t true.
In fact, Containers and VMs actually complement one another. The idea is that you do all of the setup work one-time on an image that includes all of your dependencies and the Docker engine, and then you have it host as many Containers as you need. This way you don’t have to fire up a separate VM and operating system for each application being hosting on the machine.
Like I mentioned in an earlier section, OSVs offer incredibly lightweight virtual environments that incorporate a technique known as “namespace isolation”, which ultimately allows containers to live and run alongside each other, and yet completely autonomously from one another, on the same host system.
Therefore, in most practical cases it will probably make sense for the underlying host system to be a VM.
Containers as Microservices
Containers can house portions of a solution, for example just the UI layer. Or, they can store an entire solution, from the UI to the database, and everything in between. One of the better known uses for Containers is “Micro Services”, where each container represents a separate layer of a subsystem.
What’s more, scaling the number of containers instances to meet the demands of an environment is fairly trivial. The example below depicts a number of containers being scaled up to meet the demands of a Production environment versus a Test environment. This can be accomplished in a few flips of a switch when a Container architecture is designed correctly. There are also a number of tools that you can use to create Containers, or even an environment full of Containers, such as Docker and Docker Cloud.
TEST ENVIRONMENT

PRODUCTION ENVIRONMENT

What is Docker?
Docker is an OSV toolset that was initially released to the public on September 16, 2013. It was created to support Containerized applications and it doesn’t include any bare-metal drivers.
Therefore, Containers are incredibly lightweight and serve as a universal, demand-based environment that both shares and reallocates pools of computing resources (e.g., computer networks, servers, storage, applications and services) as the environmtal demand changes.
Finally, because of their raw and minimalistic nature, Containers can be rapidly provisioned and released with very little effort.
Build it and They Will Come
Lets’s go ahead and deploy our Containerized .NET Core solution to Docker Cloud. We’re going to use Docker Cloud as the Primary Cloud Hosting Provider and Microsoft Azure as the Emergency Backup System (EBS), Cloud Hosting Provider. Not only that, but we’re going to deploy and provision all of our new resources in the Docker Cloud and Microsoft Azure in a span of about 15 minutes.
You probably think I’m feeding you a line of B.S. I’m not offended because if I didn’t know any better I would too. This is why I’m going to show you, step-by-step, how we’re going to accomplish this together.
Of course, There are just a few assumptions that I’ll make before we get started. However, even if I assume incorrectly, I’ll still make sure that you can get through the following step-by-step guide:
- Assumption number one: I’m going to assume that you already have a Microsoft Azure account set up. If you don’t, then it’s no big deal. You can simply forgo the steps that use Azure as an “Emergency Backup Site”. You’ll still get the full benefit of deploying to the Docker Cloud, which still covers most deployment scenarios.
- Assumption number two: I’m going to assume that you already have Docker for Windows installed. If not, then you can get it for free here.
- Assumption number three: I’m going to assume that you already have a Containerized application. Again, if you don’t, then it’s no big deal. I’m going to give you a couple of options here. One option is that you can use my previous post as a way to quickly create a Containerized application. You can get to my previous post by clicking here.
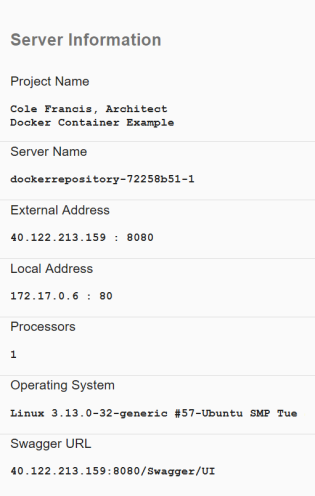
Another option you can explore is downloading the Dockerized .NET Core solution that I created on my own and made available to you at the top of this page. Basically, it’s a .NET Core MVC application, which comes with a static Admin.html page and uses AngularJS and Swagger under the hood. Through a little bit of manipulation, I made it possible for you to visualize certain aspects of the environment that your Containerized application is being hosted in, such as the internal and external IP addresses, the operating system, the number of supporting processors, etc.
Furthermore, it also incorporates a standard Web API layer that I’ve Swashbuckled and Swaggered, so you can actually make external calls to your Containerized application’s Rest API methods while it’s being hosted in the Cloud.
Finally, I’ve already included a Dockerfile in the solution, so all of your bases should be covered as I navigate you through the following steps. I’ll even show it working for me, just like it should work for you. Let’s get started…
STEP 1 – If you don’t already have a Docker Cloud account, then you can create one for free by clicking here.

STEP 2 – Setup your image repository.

STEP 3 – Add yourself as a Contributor to the project, as well as anyone else you want to have access to your repository.

STEP 4 – Open Microsoft PowerTools or a command prompt and navigate to the project directory that contains the Dockerfile. Look for it at the project level.

STEP 5 – Build the Container image using Docker. If you look at the pictorial above, you’ll see that I used the following command to build mine (**NOTE: You will need to include both the space and period at the end of the command):
docker build -t [Your Container Project Name Here] .

STEP 6 – If everything built fine, then you’ll be able to see the image you just created by running the following command:
docker images

STEP 7 – Unless you’re already running a Container, then your running Containers should obviously be empty. You can verify this by running the following command:
docker ps

STEP 8 – Run the new Docker image that you just created. You’ll do this by running the following Docker command:
docker run -d -p 8080:80 [Your Container Project Name Here]

STEP 9 – Review the Container you’re now running by using the following command. If everything went well, then you should see your new running container:
docker ps

STEP 10a – Open a browser and test your running Docker Containerized application. **Note that neither IIS or self-hosting isn’t used. Don’t run it in a Visual Studio IDE. Also note that the supporting OS is Linux and not Windows.

STEP 10b – Now run it in a Visual Studio IDE and denote the differences (e.g. Server Name, extern al listening port, the number of processors, and the hosting operating system.

STEP 11 – Log into the Docker Cloud from PowerShell or a command prompt using the following command:
docker login

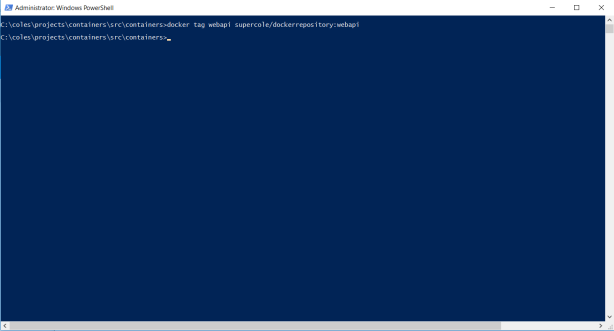
STEP 12 – Tag your container repository:
docker tag webapi supercole/dockerrepository:webapi
STEP 13 – Push your local container into the Docker Repository using the following command:
docker push supercole/dockerrepository:webapi

STEP 14 – Review the progress of your pushed container to the Docker repository.

STEP 15 – Review your Docker repository and the tag you previously created for it in Docker Cloud.

STEP 16 – Create the Docker Cloud service from your pushed container image.

STEP 17 – Review the defined environment variables for your service.

STEP 18 – Add a volume (optional).

STEP 19 – Select the number of Containers you want to host.

STEP 20 – Specify a Cloud Hosting Provider. I chose Microsoft Azure, because I already have an Azure account. Anyway, it will ask you to enter your credentials, and it will spit out a signed certificate that you’ll use to create a one-way trust between Docker Cloud and Azure.

STEP 21 – In Microsoft Azure, I uploaded the Docker Cloud certificate in order to create the trust.

STEP 22 – Go back to the Docker Cloud and launch your first node.

STEP 23- This step can take awhile, because it goes through the process of both provisioning, uploading, and activating your Docker Cloud container in Microsoft Azure.

STEP 24- After the provisioning and deploying process completes, review your Azure account for the new Docker resources that were created.

STEP 25 – You can also review the Docker Cloud Node timeline for all the activities that are occurring (e.g., Provisioning, setting up the network, deploying, et al).

STEP 26- Finishing up the Docker Cloud to Azure deployment.

STEP 27- The deployment successfully completed!

STEP 28- Launch your new service from your Docker Cloud Container repository.

STEP 29 – Wait for it…

STEP 30a – Try out your hosted Docker Container in Docker Cloud.

STEP 30b – Try out your hosted Docker Container in Microsoft Azure.
Thanks for reading and keep on coding! 🙂


Nice post Cole! The step by step setup is very helpful!
LikeLike
You are very talented!
LikeLike
Nice post Cole! It seems like containers are best suited for Cloud environment. Would you recommend it in on premise environments too? Other than micro services, what kind of .NET applications can take advantage of containers? Let say, if you have a typical .NET Core Web application that is MVC or Webforms, Entity Framework and SQL back-end, how can we containerize? Could you give some examples?
Thanks,
Chandru
LikeLike
Thanks, Chandru. In response to your question, I recommend using Containers in both Cloud and on-premises environments if possible. When you think about the current logistics and workflows are used to take a product through the alpha->beta->omega release cycles, it’s generally mind grueling! Production pushes often take weeks of preparation, they’re expensive, and they can even detract from productivity to a certain degree. Yet, despite the time and money involved in getting it right, they still occasionally fail.
In contrast, Containers can simplify ALM and DLM release cycles by significantly minimizing the time and resources it takes to complete a release cycle. They also reduce risk by the advent of namespace isolation and self-dependency models. Finally, they eliminate complex rollback processes that can vary per each application released.
In fact, if everything’s done properly, then the outcome will be increased standardization, better predictability, and significantly lower delivery costs. It all boils down to a faster, better, and cheaper time-to-market release strategy with the availability of better risk mitigation controls if something goes wrong during the release process.
The real question is whether companies be willing and able to make a major ALM/DLM shift like this? My guess is that they probably will over time, but not immediately. This is because the approach is so drastically different than what most companies do today. Many companies will need to be establish new processes and controls to make sure that certain culpabilities aren’t introduced as a part of the new release process. Despite this, these processes will be far more efficient and inexpensive that what’s currently in place today.
LikeLike
Thanks for sharing such a detailed review. Very helpful.
LikeLike